
This article is a continuation of our previous one on Appium Desktop app, where we provided the detailed steps on how you can download and install Appium Desktop, and then how you can use it to start and stop the Appium server.
In this article, we will have a closer look at the Appium Desktop’s user interface and features. The main purpose of this article is to provide you with more details about Appium Desktop client, so that you are familiar with all its features and how these features can be used.
Try it Yourself Activities: In this article, you will see some try it yourself activities. These are very simple activities, which would help you get good understanding on the different features of Appium Desktop. Give it a try and let us know if you face any issues.
Appium Desktop Client – Why is it important ?
Before you start learning about the features of Appium Desktop Client, its important to understand why this version of Appium UI is very important. If you had worked with previous versions of Appium, more specifically, Appium version 1.5 and before, then you would be aware that Appium had a separate GUI for some of these versions as well.
Then what was the need to come up with this completely new UI? The most important reason for the new version is that its now developed & maintained by Appium contributors at Sauce Labs. So hopefully, we will have UI versions released for all the future versions of Appium server. This was not the case previously. Before Appium 1.6, there were many versions of Appium server released, but only few of them had UI support.
Another important feature is that Appium Desktop Client is built with new technologies such as Electron, React and Redux. These new technologies have their own advantages in terms of coding and maintenance. If you want to get more information about the use of these technologies with Appium Desktop Client, then you can read about it here – https://github.com/appium/appium-desktop/blob/master/CONTRIBUTING.md#overview
Which Appium Desktop features would be covered in this article
Two most important features of Appium Desktop Client are –
- Appium Desktop UI and its ability to start and stop Appium server
- Appium Desktop Inspector to inspect objects in your mobile app
In this article, we will cover the Appium Desktop UI and leave the Appium Inspector to the next article.
Tabs in Appium Desktop UI
First of all, we are going to talk about the 3 tabs in Appium Desktop Client. This is because you will most likely be using these 3 tabs the most. Let’s have a look at each of these tabs one by one –


1. Simple Tab
This is the first tab that is displayed when you open Appium Desktop App. And this is the most straightforward one as well. Appium server requires minimum 2 parameters to run. And Simple tab provided these 2 parameters – Host and Port. The default values for these parameters is “0.0.0.0” (for Host) and “4723” (for Port). So if you don’t provide any specific values for these parameters, Appium would take the default ones to start the server.
This is why these default values are already displayed in the Simple tab. To give it a try, go ahead and just click on the Appium server button without changing the values for Host and Port. You will see that Appium Server will start on these default values as shown below.

You can now click on Stop Server (3rd button with pause icon) and then Close Log button (one with X icon), to navigate back to the Simple tab.
Even though, Simple tab is pretty straightforward, we generally don’t use this to open Appium server. This is because we don’t always run Appium server with the default values. This is where the Advanced tab comes into picture.
2. Advanced Tab
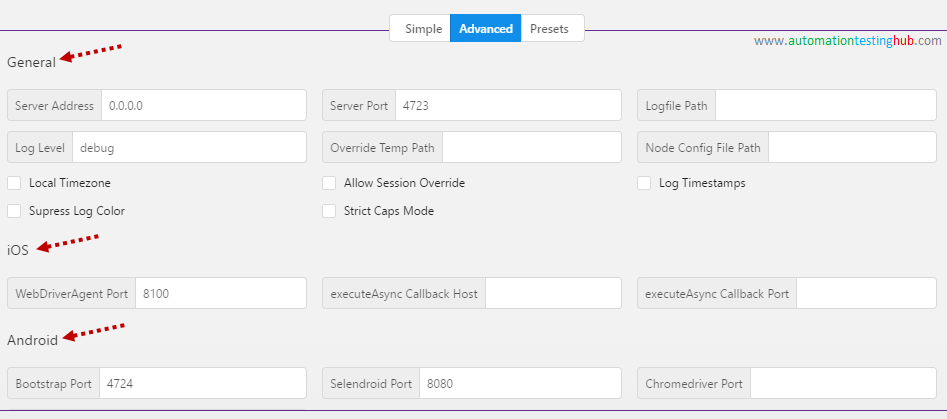
First of all, click on Advanced tab to open this section. Advanced tab contains many controls and all of them might not be visible on the screen. So you can expand Appium Desktop UI from the sides, so that you can see all its controls. From the below image, you can see that the Advanced tab is primarily grouped in 3 parts –

- General section : This section contains the options which are required for both Android and iOS
- iOS section : This section contains iOS only options
- Android section : Here, you have options needed for Android automation
Please note that the options in iOS and Android sections are not always mandatory. These options are required only in few cases, so you can skip these when you don’t need them. For example, in Android section you can see that there is an option for Chromedriver Port. This value would be needed only when you want to automate some scenarios in Chrome browser in your mobile device. But if you just want to automate an app and you don’t need to do anything on Chrome, then you should skip setting any value in this field.
Start Appium Server from Advanced tab
For the example that we are using in this Appium Tutorial series, you would not need to select any options from Android or iOS sections. We would just select the minimum set of options that enable us to run our script multiple number of times.
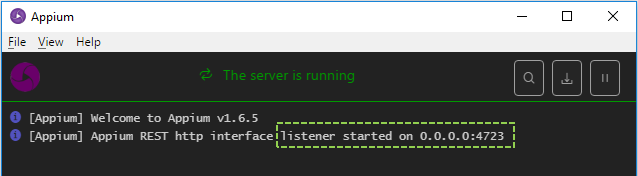
Go ahead and enter values “127.0.0.1” and “4723” in Server Address and Server Port fields. Also, tick the Allow Session Override checkbox as shown in the below image.


Now click on Start Appium button, and you would see the log screen which shows that the server is running. In the below image, check that the log lists down non-default arguments. The log shows address and sessionOverride as non-default arguments. This is because the default values for these 2 options is 0.0.0.0 (for address) and unchecked/false (for session override). Since you have changed these values, so its getting displayed in the logs.
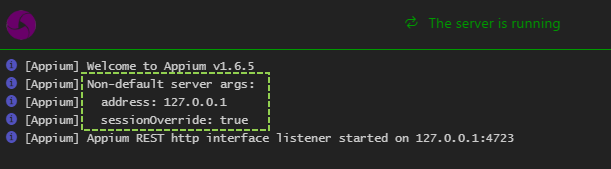

For this same reason, option port is not displayed because you are using the default value of port (which is 4723).
Try it Yourself Activity 1: Change the value of port to something else (say 5000) and see if it’s displayed in the logs as non-default server arguments.
Try it Yourself Activity 2: Select other options such as Logfile Path, Local Timezone, Log Timestamps and then start the server. See if you find any difference in the logs.
Hint: To use Logfile Path option, enter some text file location (like C:\Anish\logs.txt) and then start the server. After starting the server, check the text file.
Start New Session
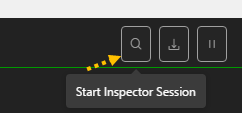
If you check the log screen, you will notice that it has a button called ‘Start Inspector Session’. This is the button from where you can start Appium Desktop Inspector.

There are some configurations that you would need to do before starting Appium Inspector. So we will leave this concept to the next article in our Appium Tutorial, where we will explain in detail the process of how you can use Appium Inspector (which we will cover in our next article on Appium Desktop this article has been covered here – Appium Desktop Inspector – Part 1).
Save As Preset… option
Let us now look at another important option which is the Save As Preset button. With this functionality, you can save the inputs that you are providing to launch Appium server. So the next time you want to start the Appium server, you can just select the Preset and run it. This way you can avoid providing all the options every time you want to start the server. Let us see how this can be done –
1. Navigate back to the Advanced tab in Appium Desktop (if you are on the logs screen, you can stop the server and then close the logs to navigate back to the Advanced tab)
2. Provide Server Address as “127.0.0.1”, Server Port as “4723” and tick Allow Session Override checkbox, as shown below
3. Now click on Save As Preset… button. A popup would be displayed as shown below
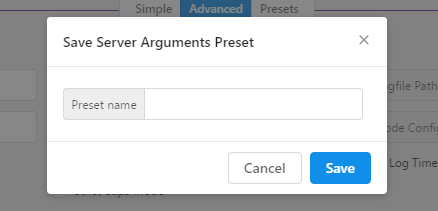

4. Give it any name (we are giving Android-Basic) and then click on Save button
5. Your preset would be successfully saved to the Presets tab (which is the third and final tab that we need to check)
3. Presets Tab
Open Presets tab. You will see that the preset you just created is displayed there. Click on this Preset to view its details. It would look something like the image below.
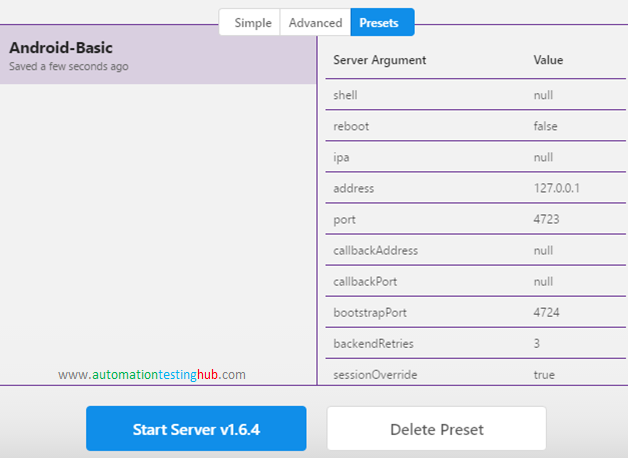

Now click on Start Appium button to start Appium server. So using this approach, you can save a preset once and then use it every time to start the server. You can save multiple presets based on the different options you use to start the Appium server.
Try it Yourself Activity 3: Try out Activity 1 and Activity 2 again, but this time save them as presets and then start the Appium server from the Presets tab.
With this, we have now covered all the 3 tabs in Appium Desktop. Let us now check the menu options as well, that you see on top of the Appium Desktop screen.
Menu options in Appium Desktop Client
Appium Desktop Client has 3 top level menus – File, View and Help. As with Appium Desktop 1.0, these menu options don’t provide any major functionalities (which you would need to use on a day to day basis). So let’s just have a quick look at these menu options.
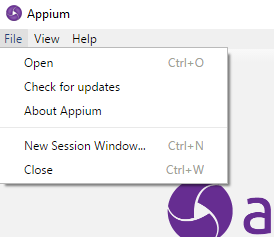
1. File menu
Under File menu, you have few different options as shown in the below image. None of these options are super useful. The only important option is New Session Window… which lets you use Appium Inspector. But you would be mostly accessing this feature from Appium logs screen (which we will show in our next article)

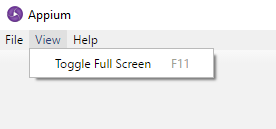
2. View menu
View menu contains just one option – Toggle Full Screen. If you select this option, then Appium Desktop would be displayed on full screen. This option would be useful if you have multiple monitors connected and you want to check Appium logs while the scripts are running (maybe for some debugging purpose). In such a scenario, you can toggle Appium logs to full screen and monitor it from a different desktop screen. Other than that, this option is not very useful.

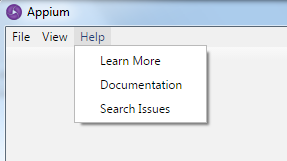
3. Help menu
Help menu contains few options and all of these point to Appium’s online resources. So this section is also not very useful from the perspective of day to day usage.

With this, we complete our article on the features Appium Desktop Client. This article is important because Appium Desktop would be Appium’s UI going forward, and it would be good if you are familiar with its UI and usage. In our next article in Appium Tutorial, we will start with Appium Inspector which would help you identify the controls in your mobile app.
As always, please feel free to share your feedback and concerns with us in the comments section.