

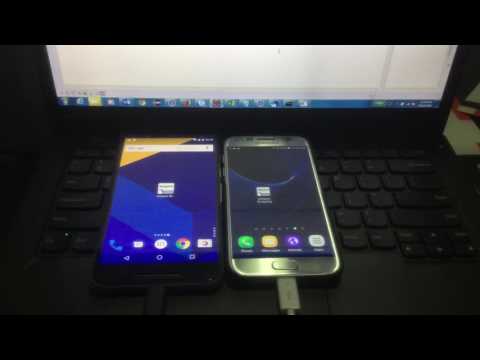
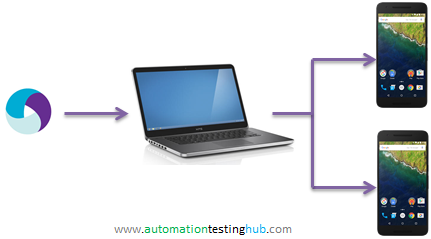
In this article we will explain the process of Appium Parallel Execution using Java Thread and Runnable interface in a detailed step by step manner. You will learn how you can run your Appium test scripts sequentially or in parallel on multiple android devices (or multiple emulators) connected to a single machine using USB ports. Before we start, have a look at the below video where we are opening an app and performing couple of actions on it simultaneously on two different android devices. What you see in the video is what we will try to achieve by the end of this article.
Dear readers, we have more articles on Appium. Have a look and see if you find anything useful. There’s lot more going on at our Facebook page. Follow us there to get the latest updates
In this article, we will provide the detailed steps and the code with which you can achieve parallel or simultaneous execution on multiple android devices.
Background – Why this article?
I have had good exposure to web based automation with tools such as QTP and Selenium, but my journey with mobile test automation with Appium is fairly new. Although Appium has a very good user support, with a lot of enthusiastic users helping everyone with their queries, but I found that a lot of documentation is very technical. And due to its technical nature it becomes bit hard for a newbie like me to understand and implement these concepts. Hence this article, where I will try to explain the process of Appium parallel execution in a detailed step by step manner.
Prerequisites – Expectations from the Target Audience
Even though this article explains Appium parallel execution from a newbies perspective, but the target audience needs to have a very basic understanding of Appium. Since this article is bit of an advanced topic, or to put it differently, this is not a topic that a person would try to explore during their first few days with Appium learning, so we expect the readers –
- have a basic understanding of mobile test automation and how Appium fits in
- have done the necessary Appium setup on their machines (Appium server, ADB etc)
- are able to create and run some basic test scripts on mobile applications
- are aware of the basics of Java and Selenium
Appium Parallel Execution – Setup that we have used
The setup that we have used for Appium is as follows –
- Laptop : Windows 10
- Appium Server : Version 1.6.5
- Mobile Devices : Nexus 6P and Samsung Galaxy S7, both running Android 6.0.1
- Connection Method : Both mobile devices connected to the same laptop via USB ports

Appium Setup for Parallel or Sequential Execution
To execute your scripts on multiple devices, you would need to work at two different places – one is at Appium Server and the other one is in the Java code. In this section, we will first see the work we need to do at Appium Server side.
Important Note: There should be one Appium server instance started for each device you want to run your test scripts on. For example, if you want to run your tests in 3 different android devices, you would need to start 3 different instances of Appium Servers. In our case, we would need 2 Appium Servers, as we would be running our script in 2 different devices.
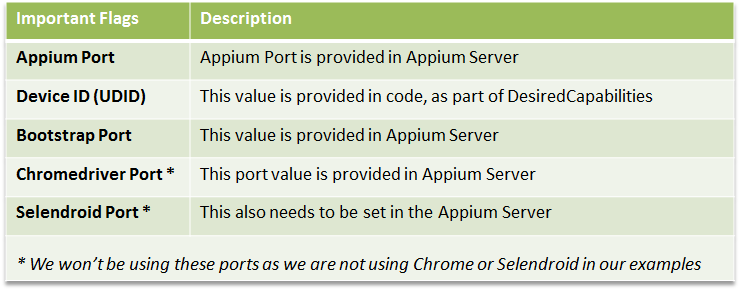
When you start multiple instances of Appium Servers, you would need to make sure that you provide different values for the following –
- Appium Port
- Device ID
- Appium Bootstrap Port
- ChromeDriver Port (this has to be used only if you are using webviews or chrome browser
- Selendriod Port (this needs to be used only if you are using selendroid)
In our example, we are not using webviews, chrome browser or selendroid. Hence, we are only concerned with Appium Port, Device ID and Appium Bootstrap Port
Let us now start with the setup at the Appium end.
Start 2 instances of Appium Server
Follow the steps given below to start two instances of Appium Server by providing different values for Server Port and Bootstrap port.
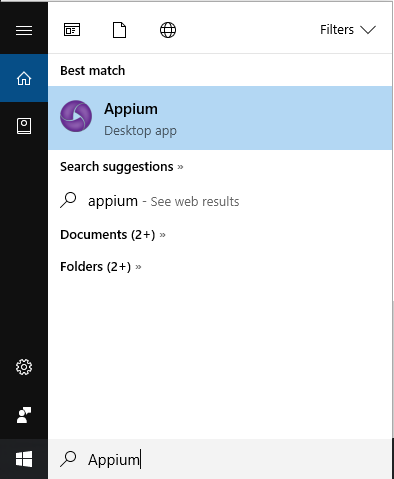
1. Open Appium Desktop from Start Programs

2. Go to Advanced tab and enter the following values in the fields as given below –
- Server Address – 0.0.0.0
- Server Port – 4723
- Bootstrap Port – 100
- Allow Session Override checkbox – Tick
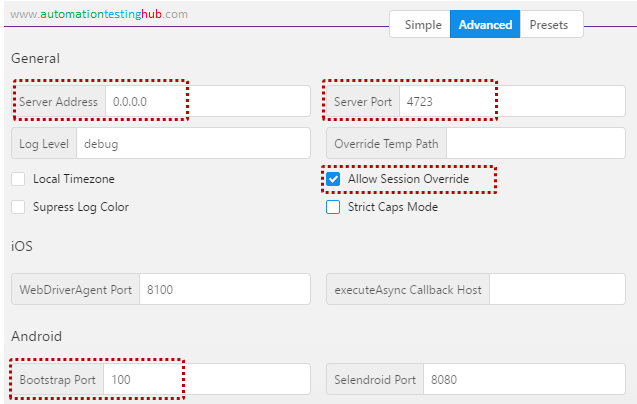

Please note that you can enter any valid port number (valid port number is any number between 0 and 65535) in Bootstrap Port field. Note down that port numbers that you used here, as these will be needed in the test script later on.
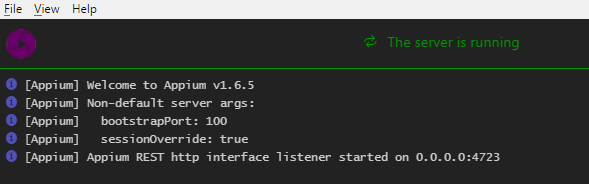
3. Start the Appium server. The logs will show that the server is running

Now, follow the same steps that we mentioned above to start the second instance of Appium Server. Make sure that you give different values of Server Port and Bootstrap Port for this instance.
4. Open a new instance of Appium Desktop and in the Advanced tab, set the values as mentioned below –
- Server Address – 0.0.0.0
- Server Port – 5000
- Bootstrap Port – 200
- Allow Session Override checkbox – Tick
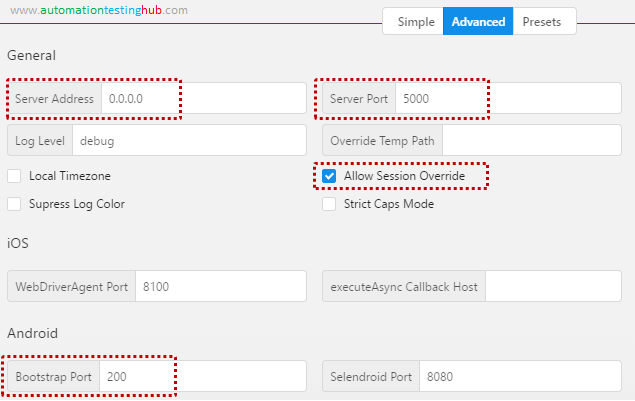

5. Start this instance of Appium server as well. You can see from the logs that the server would have started


This completes the setup at Appium Server end. Let us now move over to the next section where we will connect both the mobile devices to the machine.
Connect both the mobile devices to the machine
Connect both your devices to your machine via USB. Use the below steps to make sure that both the devices are properly connected –
1. Open command prompt and set the path of the folder where you have ADB
2. Run the command – adb devices. This command should list down both the devices connected to your machine as shown in the below image. If both the devices are displayed, then you are good to go ahead with the next steps (In this scenario, we have added ADB in PATH variable, hence we are executing the command directly from the default folder. If you have not added it in PATH variable, you need to first go to the folder where you have ADB)
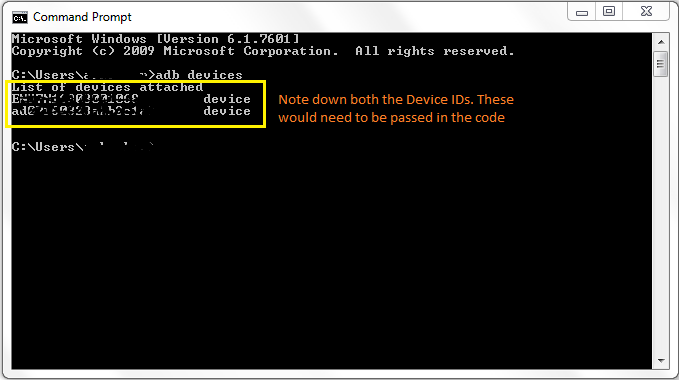

Also, note down both the Device IDs from command prompt. This Device ID is actually the UDID, which you would need to provide in the code later.
Desired Capabilities logic for launching app on mobile device
In this section, we will show you the main code that you would need to launch the app on your mobile device. In this example, we are using Amazon shopping app as our test app.
The Desired Capabilities code is given below –
AppiumDriver driver;
DesiredCapabilities capabilities = new DesiredCapabilities();

//Set the capabilities
capabilities.setCapability("deviceName", "My Nexus");
capabilities.setCapability("udid", "ENUXXXXXXXXXXXXXXX");
capabilities.setCapability("platformVersion", "6.0.1");
capabilities.setCapability("platformName", "Android");
capabilities.setCapability("appPackage", "com.amazon.mShop.android.shopping");
capabilities.setCapability("appActivity", "com.amazon.mShop.home.HomeActivity");

//Launch the app using the appium port number that you provided in the Appium server
try {
    driver = new AndroidDriver(new URL("http://0.0.0.0:4723/wd/hub"), capabilities);
    Thread.sleep(10000);
} catch (MalformedURLException e) {
    e.printStackTrace();
}
Couple of important points about the code –
1. deviceName is a mandatory property, but its value can be anything. deviceName is not used to identify your mobile device in anyway
2. udid is not a mandatory property. If you use only one mobile device, then you can run your scripts without this property as well. Since you have only 1 device and that means only 1 Appium server running, so Appium can run the script based on just the port number. However, when you have multiple devices connected to your device, you would need to provide their UDIDs so that Appium can identify the device using the UDID. This UDID is the same that was displayed when you executed adb devices command
If you want to run your code sequentially on both the devices, you just need to write the same code twice and pass different values for Appium port and device id. That way when you run the test case, it will run it on both the devices one after the other.
Code to run test script in parallel on both devices
Below is the code that you can use to launch the app simultaneously on both devices. The program uses Java concurrency concepts such as Thread and Runnable Interface to run the test script in parallel on both devices. Executing the code launches the app in the same way as is shown in the video in the beginning of the article.
The below code uses Selenium Page Factory Model, in the way it identifies the objects in the mobile app. If you are not comfortable with Page Factory Model then can use their own logic. Only important thing that you have to make sure is that you should pass the proper port number and device id, when you implement the Runnable interface.
import java.net.MalformedURLException;
import java.net.URL;

import org.openqa.selenium.WebElement;
import org.openqa.selenium.remote.DesiredCapabilities;
import org.openqa.selenium.support.PageFactory;

import io.appium.java_client.AppiumDriver;
import io.appium.java_client.android.AndroidDriver;
import io.appium.java_client.pagefactory.AndroidFindBy;
import io.appium.java_client.pagefactory.AppiumFieldDecorator;

public class AppiumParallelExecution implements Runnable {

    String port;
    String udid;

    public AppiumParallelExecution(String portNumber, String udid) {
        this.port = portNumber;
        this.udid = udid;
    }

    @AndroidFindBy(id="com.amazon.mShop.android.shopping:id/action_bar_burger_icon")
    private WebElement hamburgerIcon;

    @AndroidFindBy(id="com.amazon.mShop.android.shopping:id/gno_greeting_text_view")
    private WebElement hello;

    @AndroidFindBy(id="ap_email")
    private WebElement email;

    @AndroidFindBy(id="ap_password")
    private WebElement password;

    AppiumDriver driver;
    DesiredCapabilities capabilities = new DesiredCapabilities();


    private void openAppAndPerformSomeActions() {
        capabilities.setCapability("deviceName", "My Mobile Device");
        capabilities.setCapability("udid", udid);
        capabilities.setCapability("platformVersion", "6.0.1");
        capabilities.setCapability("platformName", "Android");
        capabilities.setCapability("appPackage", "com.amazon.mShop.android.shopping");
        capabilities.setCapability("appActivity", "com.amazon.mShop.home.HomeActivity");

        try {
            driver = new AndroidDriver(new URL("http://0.0.0.0:" + port + "/wd/hub"), capabilities);
            Thread.sleep(10000);
        } catch (MalformedURLException e) {
            e.printStackTrace();
        } catch (InterruptedException e) {
            e.printStackTrace();
        }

        PageFactory.initElements(new AppiumFieldDecorator(driver), this);

        hamburgerIcon.click();
        hello.click();
    }

    public static void main(String args[]) {
        Runnable r1 = new AppiumParallelExecution("5000", "ah37kjf982a2b2c1a9"); //device id of first mobile device
        Runnable r2 = new AppiumParallelExecution("4723", "BDE3N1678E001068"); //device id of second mobile device
        new Thread(r1).start();
        new Thread(r2).start();
    }

    @Override
    public void run() {
        openAppAndPerformSomeActions();
    }
}
Try it out and let us know how it works out for you. Also please share with us your feedback on this article, on how we can improve our articles to make it more useful to all our readers.