
When you start learning Appium or start writing your first test script with it, your initial approach (especially from a beginner’s point of view) would be to start and stop the Appium server manually. Initially, a lot of people start working with the GUI based Appium versions. GUI versions of Appium are easy to use, and users can easily start and stop the Appium server manually using the controls provided in the tool. After some time, many people would download and install the latest versions of Appium, which most of the times would be a non-GUI version. And its still relatively easy to start and stop the non-GUI version of Appium manually.
Eventually there would come a time, when you are in the process of designing a good and robust test automation framework. And as part of this, you might also start thinking about removing all the manual steps involved in test execution, so that you can achieve the objective of continuous testing and feedback. Starting and stopping the Appium server manually would become a huge bottleneck to your approach. To remove this bottleneck, you would need to start and stop the Appium server programmatically. Hence, we have come up with this article which will help you start Appium server from Java.
Different methods to Start Appium server from Java
Good news is it doesn’t matter what type of Appium version you are using – be it GUI based Appium server, or non-GUI based versions (run from command prompt/terminal), both these types of Appium versions can be started and stopped programmatically using Java. There are 3 different methods that we use to start and stop Appium server from Java, two of which cater to the non-GUI version and the 3rd one would work for the GUI version. All these 3 methods are given below –

Let us have a look at each of these methods one by one.
Method 1: Start Appium server using AppiumDriverLocalService
To use this method to start Appium server, you need to first make sure that the following pre-requisites are met –
- Node.js should be installed on your machine
- Appium server should have been installed via NPM
If you have not installed Appium using NPM, then please follow this link for the setup process – Download and Install Appium using NPM
Let us now see how you can start Appium server from Java using this method. There are two main classes which you will be using here –
- AppiumDriverLocalService : This is the class which is used to start and stop the Appium server
- AppiumServiceBuilder : This class is used to build the Appium service, i.e. you can use this class to set the server address, port, desired capabilities and other flags before starting the Appium server
Simplest Implementation:
The simplest way to use this service is where you just use the default service and then start/stop the Appium server. The code for this implementation is given below –
AppiumDriverLocalService service = AppiumDriverLocalService.buildDefaultService();
service.start();
//your test scripts logic...
service.stop();
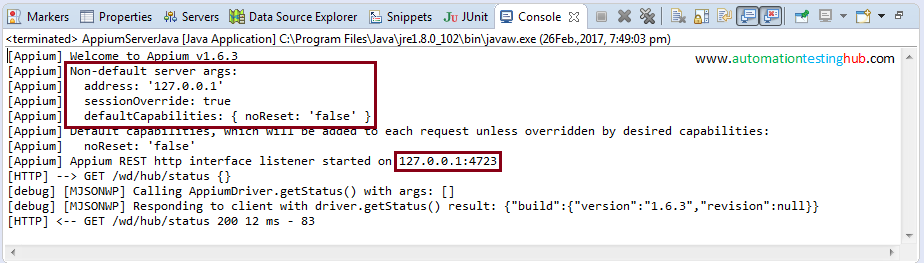
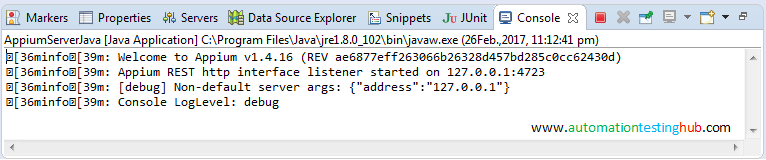
Once you execute the above code, you will see from Eclipse Console window that Appium server has been started. Please check that the since you used the buildDefaultService() method, the port and server used are 0.0.0.0:4723, as shown below.


Implementing AppiumServiceBuilder to add more arguments:
With AppiumServiceBuilder, you have the option to configure the Appium Server, where you can add a different address, port, capabilities and other server flags. The code given below illustrates how this can be done –
Edit 1 [11 Sep 2017]: We have added an additional functionality where you can check if the server is already running or not. And you can start the Appium server only if its not already running. The logic here is to figure out if the port is in use or not. Generally, the ports that you use with Appium are not used by other applications. So if the port is already in use, it is safe to assume that Appium server is running on the port.
This way you start the Appium server only if the port is not in use.
import org.openqa.selenium.remote.DesiredCapabilities;
import io.appium.java_client.service.local.AppiumDriverLocalService;
import io.appium.java_client.service.local.AppiumServiceBuilder;
import io.appium.java_client.service.local.flags.GeneralServerFlag;

public class AppiumServerJava {

	private AppiumDriverLocalService service;
	private AppiumServiceBuilder builder;
	private DesiredCapabilities cap;

	public void startServer() {
		//Set Capabilities
		cap = new DesiredCapabilities();
		cap.setCapability("noReset", "false");

		//Build the Appium service
		builder = new AppiumServiceBuilder();
		builder.withIPAddress("127.0.0.1");
		builder.usingPort(4723);
		builder.withCapabilities(cap);
		builder.withArgument(GeneralServerFlag.SESSION_OVERRIDE);
		builder.withArgument(GeneralServerFlag.LOG_LEVEL,"error");

		//Start the server with the builder
		service = AppiumDriverLocalService.buildService(builder);
		service.start();
	}

	public void stopServer() {
		service.stop();
	}

	public boolean checkIfServerIsRunnning(int port) {

		boolean isServerRunning = false;
		ServerSocket serverSocket;
		try {
			serverSocket = new ServerSocket(port);
			serverSocket.close();
		} catch (IOException e) {
			//If control comes here, then it means that the port is in use
			isServerRunning = true;
		} finally {
			serverSocket = null;
		}
		return isServerRunning;
	}

	public static void main(String[] args) {
		AppiumServerJava appiumServer = new AppiumServerJava();

		int port = 4723;
		if(!appiumServer.checkIfServerIsRunnning(port)) {
			appiumServer.startServer();
			appiumServer.stopServer();
		} else {
			System.out.println("Appium Server already running on Port - " + port);
		}
	}
}
Note that, with this approach we have used buildService() method instead of buildDefaultService() method. When you run this code, you will see that the Appium server is now started with all the capabilities and flags that you had provided with the service builder.

Have a look at these pages to get more information on these classes and the methods that you can use – AppiumDriverLocalService and AppiumServiceBuilder
Method 2: Using Appium.js with Node.exe (opening GUI version of Appium using code)
This is the approach, where you can open the GUI version of Appium using Java code. Please note that this approach will not directly open the GUI version, i.e., you won’t see the GUI version opened on the screen. It’s a sort of headless mode, where you will see that the server has been started in Eclipse command prompt, but you won’t see the actual GUI be opened on the screen. Let’s first start with the pre-requisites that you have to complete before using this approach.
Pre-requisites:
- Node.js should be installed on your machine
- GUI version of Appium should be installed
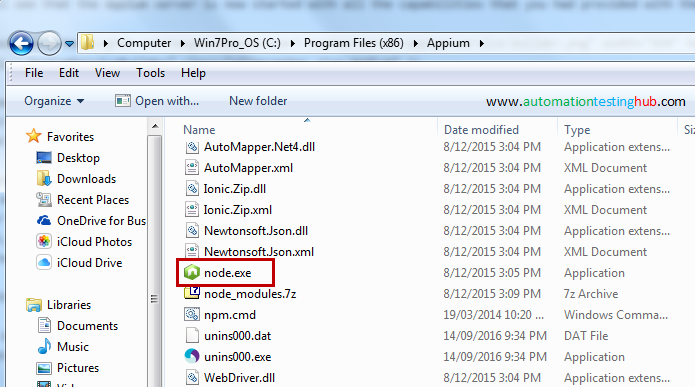
First of all, you need to find out the folder location where node and Appium are installed. This is important as you would need to supply these folder locations in Java code. Node.exe is normally installed in Appium folder. Check the folder where you have Appium installed and see if it has node.exe there. Generally, the default folder location is – C:\Program Files (x86)\Appium\

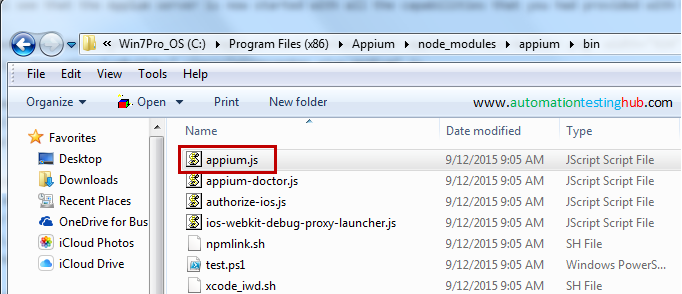
So the path for Node.exe that you would use is – C:\Program Files (x86)\Appium\node.exe. Let’s now check the location of Appium.js which is generally also there in the Appium folder – C:\Program Files (x86)\Appium\node_modules\appium\bin

So, the path that we will use for Appium.js is – C:\Program Files (x86)\Appium\node_modules\appium\bin\Appium.js Please note that if you have Appium installed in any other location, then please change the path accordingly for both node and appium.js
Let’s now come to the actual code. With this approach, we will use CommandLine class to setup Appium server variables, and DefaultExecuteResultHandler to launch the Appium server. The complete code is given below (replace the folder paths if they are different in your case) –
import java.io.IOException;
import org.apache.commons.exec.CommandLine;
import org.apache.commons.exec.DefaultExecuteResultHandler;
import org.apache.commons.exec.DefaultExecutor;

public class AppiumServerJava {

	public void startServer() {
		CommandLine cmd = new CommandLine("C:\\Program Files (x86)\\Appium\\node.exe");
		cmd.addArgument("C:\\Program Files (x86)\\Appium\\node_modules\\appium\\bin\\Appium.js");
		cmd.addArgument("--address");
		cmd.addArgument("127.0.0.1");
		cmd.addArgument("--port");
		cmd.addArgument("4723");

		DefaultExecuteResultHandler handler = new DefaultExecuteResultHandler();
		DefaultExecutor executor = new DefaultExecutor();
		executor.setExitValue(1);
		try {
			executor.execute(cmd, handler);
			Thread.sleep(10000);
		} catch (IOException | InterruptedException e) {
			e.printStackTrace();
		}
	}

	public void stopServer() {
		Runtime runtime = Runtime.getRuntime();
		try {
			runtime.exec("taskkill /F /IM node.exe");
		} catch (IOException e) {
			e.printStackTrace();
		}
	}


	public static void main(String[] args) {
		AppiumServerJava appiumServer = new AppiumServerJava();
		appiumServer.startServer();

		appiumServer.stopServer();
	}
}
Once you run the above code, Appium server will be started. To check that, you can have a look at the log console in Eclipse. You will see the logs similar to what is shown in the below image. Also, please note that the Appium server version shown in the logs is same as the GUI version that you would have installed.

To stop this Appium server, we are just killing the node.exe process which gets created when the Appium server is started.
Method 3: Start Appium server using Command Prompt
With this approach, you mimic the manual process of opening command prompt and launching Appium server. Let us first check the manual steps and then we will check out the code which will replicate this manual approach.
Manual Process:
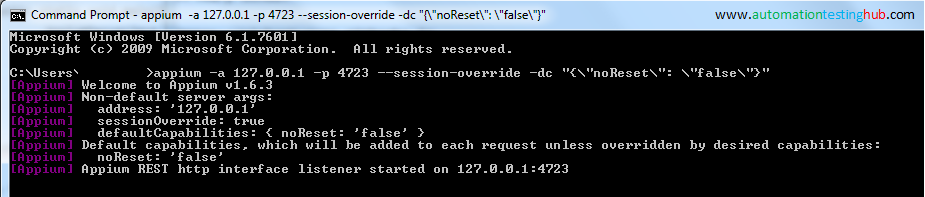
- Open Command Prompt
- Run the following command – appium -a 127.0.0.1 -p 4723 –session-override -dc “{\”noReset\”: \”false\”}”
- Hit ENTER
The above command would start the Appium server as shown the below image –

Below is the code which opens command prompt and launches Appium with the same command that we have given above. Please note that there is a slight change in the command format due to addition of escape characters. Also, launching cmd is also added as part of this command.
import java.io.IOException;

public class AppiumServerJava {

	public void startServer() {
		Runtime runtime = Runtime.getRuntime();
		try {
			runtime.exec("cmd.exe /c start cmd.exe /k \"appium -a 127.0.0.1 -p 4723 --session-override -dc \"{\"\"noReset\"\": \"\"false\"\"}\"\"");
			Thread.sleep(10000);
		} catch (IOException | InterruptedException e) {
			e.printStackTrace();
		}
	}

	public void stopServer() {
		Runtime runtime = Runtime.getRuntime();
		try {
			runtime.exec("taskkill /F /IM node.exe");
			runtime.exec("taskkill /F /IM cmd.exe");
		} catch (IOException e) {
			e.printStackTrace();
		}
	}

	public static void main(String[] args) {
		AppiumServerJava appiumServer = new AppiumServerJava();
		appiumServer.startServer();

		appiumServer.stopServer();
	}
}
Once you run this code, you will see that the code automatically opens command prompt and launches Appium as shown below –


If you think that the command is bit complex, that’s due to the fact that there are many escape characters used. If you want to keep it simple, you can just use the basic command where you just set the Appium server and port as shown below –
runtime.exec("cmd.exe /c start cmd.exe /k \"appium -a 127.0.0.1 -p 4723\"");
Also, please have a look at the stopServer() method. In this method, we are using taskkill /F /IM command, which is used to kill a process from task manager. Once you launch Appium server with this method, then have a look at the processes in Task Manager. You will see that a node.exe process would be displayed there. To stop the server, we first kill the node process and after that we are kill the cmd process to close the command prompt.
This completes our article on starting and stopping Appium server from Java. Try out these methods and let us know if it works for you. If you face any issues, please contact us using the comments section.