
In this article, we will talk about different scroll strategies that you can use in your Appium test scripts. We will also provide detailed appium scroll examples which will help you come up with the best logic for your own scripts. Let us first have a quick look at the topics that we will cover in this article.
Topics covered in this article
In this article, we will have a look at the following items –
- Appium Scroll using UIScrollable and UISelector
- Scrolling using TouchActions
- Numerous examples (with screenshots) of horizontal and vertical scroll
Note: This article is bit long as it shows multiple scenarios and examples on how to scroll using Appium. The approach that we recommened here is to go through the complete article, and then identify the best scroll strategy based on the mobile app you are testing.
If you have any doubts anywhere, then please feel free to contact us using the comments section. Let us now start with the first topic.
Appium Scroll Examples using UIScrollable – Introduction
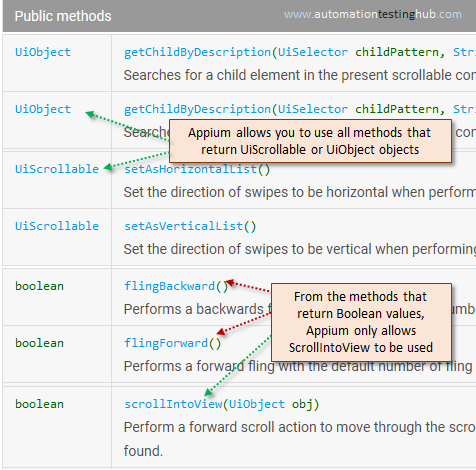
UIScrollable is an Android class that provides support for searching for items in scrollable layout elements. You can use this class with both horizontal and vertical scrolls. This class provides a lot of methods as shown in this link – UIScrollable Android
Important Note: Even though this class provides a lot of methods, Appium, as of now can only use a few of these methods. With Appium you can currently use all the methods that return UiScrollable or UiObject objects. And from all the methods that return boolean or int values, you can only use ScrollIntoView method. Rest of the methods currently don’t work with Appium. Appium might add support to these methods in some upcoming versions.

Appium Scroll Examples and Scenarios – UIScrollable
Let us now have a look at some examples and scenarios on how you can use UIScrollable with Appium to scroll through a scrollable list. All the examples will use Google Play Store as the app under test. We will also provide various screenshots so that it becomes easier for you to see how the code is implemented.
Scenario 1 – UIScrollable getChildByText()
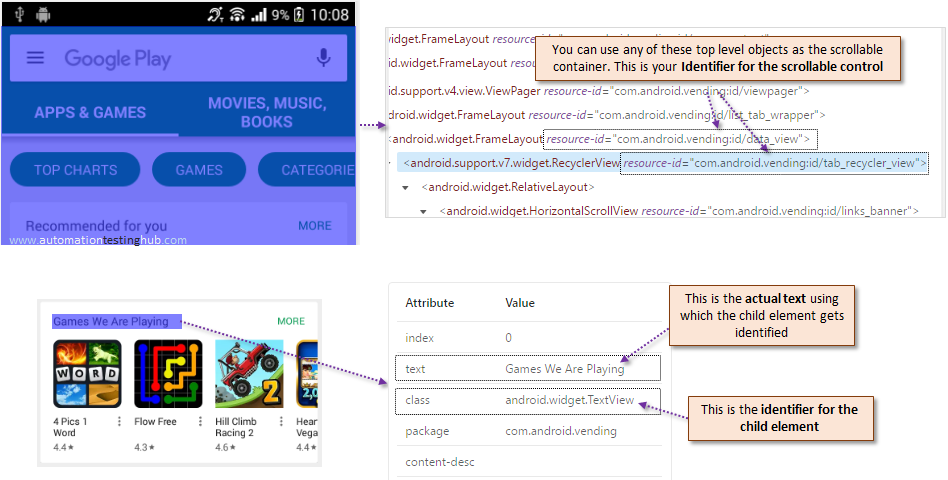
getChildByText() method searches for a child element, using its text, in a scrollable list. To use this method, you would need to identify the following 3 parameters –
- Identifier for the scrollable container (this is common across all the methods, as this is the list in which the code would scroll to find the element
- Identifier for the child element. Example: whether the child element is a TextView, Button etc
- The actual text of the child element
This will get clear once you have a look at the this example. The scenario is to scroll through Google Play Store app, and then identify the element which has text – ‘Games We Are Playing’. The 3 parameters that you need here are shown in the below image –

The code for this scenario is given below –
MobileElement element = driver.findElement(MobileBy.AndroidUIAutomator(
				"new UiScrollable(new UiSelector().resourceId(\"com.android.vending:id/tab_recycler_view\")).getChildByText("
				+ "new UiSelector().className(\"android.widget.TextView\"), \"Games We Are Playing\")"));

//Perform the action on the element
element.click();
Please check the format of the above code very carefully. Similar format will be used for all scroll methods that use UIScrollable class. The convention is to –
- first identify the scrollable control
- then call the appropriate method, getChildByText(), in this case
- and then finally pass parameters to this method
In the above example, we have used UISelector().resourceId() to identify the scrollable control. You can use any other unique property as well. Check this link to find out the other methods that you can use in place of resourceId() – UISelector Methods
Let us now look at the second example, where you will use getChildByDescription() method to scroll through the list.
Scenario 2 – UIScrollable getChildByDescription()
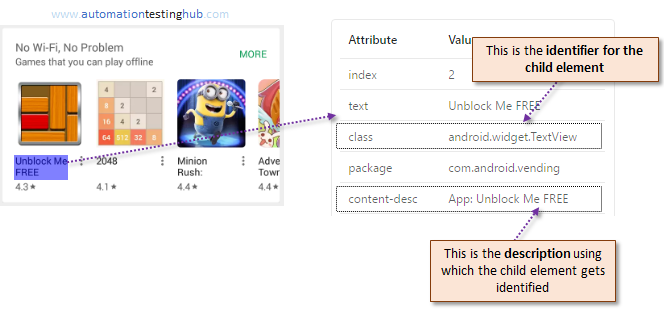
getChildByDescription() method works the same way as getChildByText(), with the only difference being that it searches for the child element using its content-desc property. The syntax and the structure of the code remains the same. Let us have a look at how you can use this method.
Example: Scroll through Google Play Store app, and find the app with text – ‘Unblock Me FREE’

MobileElement element = driver.findElement(MobileBy.AndroidUIAutomator(
				"new UiScrollable(new UiSelector().resourceId(\"com.android.vending:id/data_view\")).getChildByDescription("
				+ "new UiSelector().className(\"android.widget.TextView\"), \"App: Unblock Me FREE\")"));

//Perform the action on the element
System.out.println(element.getText()); //This would print - Unblock Me FREE
In the above code, we have used a different scrollable container from what was used in Scenario 1. This scrollable container is the parent for the container used in the first scenario. This shows that hierarchy of the scrollable containers don’t matter much. You can use any scrollable container which can be identified uniquely.
If you wish, you can make this code generic as well. This way you can resue it wherever required. The below code shows how this can be done.
private MobileElement scrollToElementUsing_getChildByDescription(String scrollableList, String uiSelector, String contentDesc) {
		MobileElement element = driver.findElement(MobileBy.AndroidUIAutomator(
				"new UiScrollable(new UiSelector().resourceId(\"" + scrollableList + "\")).getChildByDescription("
				+ "new UiSelector().className(\"" + uiSelector + "\"), \"" + contentDesc + "\")"));

		return element;
}
You can then invoke this method in your code like this –
MobileElement element = scrollToElementUsing_getChildByDescription("com.android.vending:id/data_view", "android.widget.TextView", "App: Unblock Me FREE");
Its a good approach to write Appium scroll code in these generic functions. This way you will be able to easily invoke this logic wherever required. And this approach can be followed with all the methods that we will provide in this article.
Let us now look at some more examples of how to identify elements in a scrollable list.
Scenario 3 – UIScrollable scrollIntoView
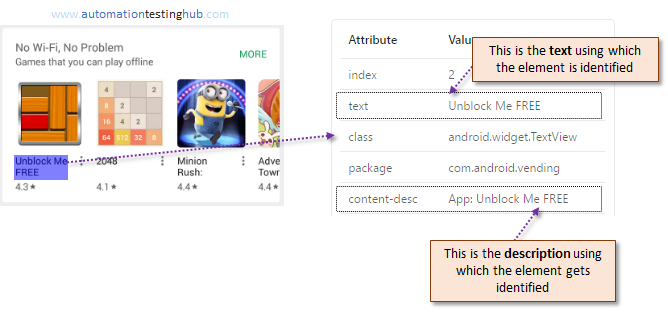
ScrollIntoView method works the same way as scenario 1 and 2 that we mentioned above. But its bit more simpler implementation than methods mentioned earlier. This is because you need to provide only one property of the element where you want to scroll, and not two properties which you did with the earlier methods.
Moreover, ScrollIntoView can be used with both text and content description as shown in the example below.
Example: Let’s consider the same example from Scenario 2, where you want to scroll to the app which has text ‘Unblock Me FREE’

The code for ScrollIntoView() method is given below –
//Identify Elememt using Text
MobileElement element = driver.findElement(MobileBy.AndroidUIAutomator(
				"new UiScrollable(new UiSelector().resourceId(\"com.android.vending:id/data_view\")).scrollIntoView("
				+ "new UiSelector().text(\"Unblock Me FREE\"))"));

//OR

//Identify Element using Content Description
MobileElement element = driver.findElement(MobileBy.AndroidUIAutomator(
				"new UiScrollable(new UiSelector().resourceId(\"com.android.vending:id/data_view\")).scrollIntoView("
				+ "new UiSelector().description(\"App: Unblock Me FREE\"))"));

//Perform the action on the element
System.out.println(element.getLocation());
Scenario 4 – Using instance() method
You can use instance() method with any of the above mentioned UIScrollable examples to find the Nth occurrence of the object you are looking for. The below example will make this more clear.
Example: Scroll through the list and identify the 3rd element which contains the text ‘You’. From the below screenshot, you can see that the 3rd instance of ‘You’ occurs in the text – ‘Recommended for You’. Please note that this method is not case-sensitive, so ‘You’ and ‘you’, both mean the same. Also, the index is zero based. So to identify the 3rd element, you would need to pass the index as 2.
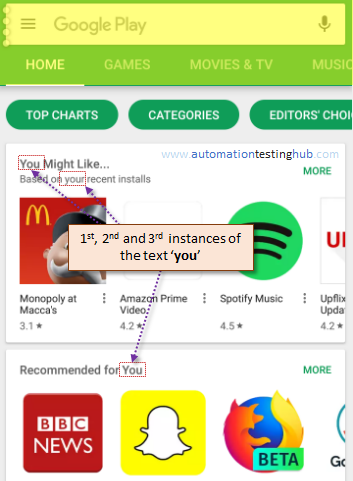

MobileElement element = driver.findElement(MobileBy.AndroidUIAutomator(
				"new UiScrollable(new UiSelector().resourceId(\"com.android.vending:id/data_view\")).scrollIntoView("
				+ "new UiSelector().textContains(\"You\").instance(2))"));

		//Perform the action on the element
		System.out.println(element.getAttribute("text")); //This line should print Recommended for You
Also, please note that in the above code we have used method textContains() to identify the element. There are many more methods such as textMatches(), textStartsWith() etc, which you can use. Similar methods are available for resource id as well. Please have a look at Android UISelector to get the list of all these methods.
Scenario 5 – Using setMaxSearchSwipes() method
There might be some scenarios where you would want to set a limit on the number of swipes your code performs. setMaxSearchSwipes() method helps you achieve this. In the code given below, the swipe operation would work for a maximum number of 5 times only. If the element you are looking for doesn’t get displayed within 5 swipes, then the script would fail.
MobileElement element = driver.findElement(MobileBy.AndroidUIAutomator(
				"new UiScrollable(new UiSelector().resourceId(\"com.android.vending:id/data_view\")).setMaxSearchSwipes(3).scrollIntoView("
				+ "new UiSelector().descriptionContains(\"Unblock Me FREE\"))"));

		//Perform the action on the element
		System.out.println(element.getText());
Scenario 6 – UIScrollable Horizontal Scrolling
All the examples that you have seen till now are for vertical scroll. In this scenario, we will show how you can scroll horizontally through a list using UIScrollable. You can perform horizontal scrolling using the method setAsHorizontalList(). This method just sets the direction of the scroll and it needs to be used with your normal scroll methosds like scrollIntoView, getChildByText, getChildByDescription etc.
Example: Consider the scenario where you have to scroll horizontally through the list which contains the elements – TOP CHARTS, CATEGORIES, EDITOR’s CHOICE etc, as shown in the below image. And consider that you need to scroll till you find the element FAMILY.
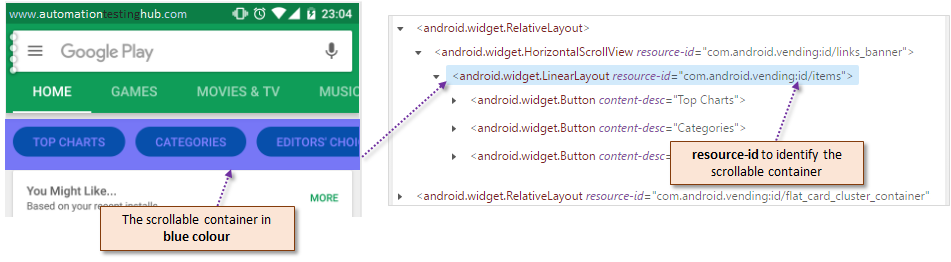

This can be done by the code given below
MobileElement element = driver.findElement(MobileBy.AndroidUIAutomator(
				"new UiScrollable(new UiSelector().resourceId(\"com.android.vending:id/items\")).setAsHorizontalList().scrollIntoView("
				+ "new UiSelector().descriptionContains(\"Family\"))"));

		//Perform the action on the element
		System.out.println(element.getAttribute("id"));
Please note that we have used setAsHorizontalList() method in the above code to specify that we want to scroll horizontally. There is one more method – setAsVerticalList() which sets the scroll direction to vertical. But we generally don’t use this method as the default direction of scroll is vertical in case you dont specify one.
With the we complete this section of scrolling using UIScrollable and UISelector. Let’s now have a look at the next section which will show how you can scroll through your mobile app using TouchActions.
Appium Scroll using TouchActions
TouchActions class is similar to the Actions class in Selenium. TouchActions class allows you to perform varios gesture actions on your mobile app. These gestures include events such as tap, press, moveTo, longPress etc. Lets see how you can use TouchActions to perform scroll operation.
With TouchActions you need to provide a start position and an end position. These start and end positions can either be actual elements on the mobile app or these can be screen coordinates as well. Let us have a look at the examples of both the scenarios.
TouchActions using Elements
TouchActions using elements is a good scroll approach when you know what elements are displayed in the scrollable list. Let’s look at the example where you want to scroll horizontally through the list which contails elements – Top Charts, Categories, Editor’s Choice etc. This horizontal list is a good candidate to use TouchActions using Elements because the elements here mostly same. It’s not like the apps list below which keeps on changing very often.
When you scroll horizontally, you generally scroll from right to left. This means that you can press Editor’s Choice element, and then you can move your finger to Top Charts. This way you will be able to scroll horizontally through the list.
Let’s see the code with which you can achieve this –
//Generic function for Scroll
public void scrollUsingTouchActions_ByElements(MobileElement startElement, MobileElement endElement) {
	TouchAction actions = new TouchAction(driver);
	actions.press(startElement).waitAction(Duration.ofSeconds(2)).moveTo(endElement).release().perform();
}
In the above code we have added waitAction method which makes sure that the scrolling happens slowly. You can remove it if you dont need it. You can invoke this method in your code as follows –
MobileElement categories = driver.findElement(MobileBy.xpath("//android.widget.TextView[@text = 'Categories']"));
MobileElement topCharts = driver.findElement(MobileBy.xpath("//android.widget.TextView[@text = 'Top Charts']"));
scrollUsingTouchActions_ByElements(categories, topCharts);
Suppose you want to scroll multiple times through the same list. This can be done easily by providing different elements every time you scroll. Only important thing that you have to make sure is that you dont define all the elements before starting with the first scroll. This is because all these elements would not be present initially unless you scroll to that portion of the screen. The below code shows how you can achieve this –
MobileElement categories = driver.findElement(MobileBy.xpath("//android.widget.TextView[@text = 'Categories']"));
MobileElement topCharts = driver.findElement(MobileBy.xpath("//android.widget.TextView[@text = 'Top Charts']"));
scrollUsingTouchActions_ByElements(categories, topCharts);

//The element positions in the screen have changed. So we need to define the elements again
categories = driver.findElement(MobileBy.xpath("//android.widget.TextView[@text = 'Categories']"));
MobileElement earlyAccess = driver.findElement(MobileBy.xpath("//android.widget.TextView[@text = 'Early Access']"));
scrollUsingTouchActions_ByElements(earlyAccess, categories);
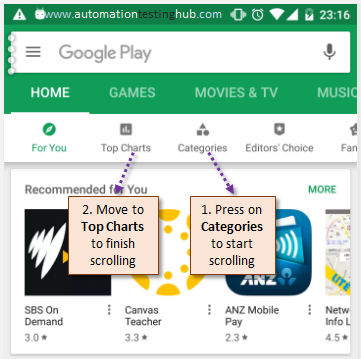

TouchActions using Screen Coordinates
TouchActions using coordinates works the same way as TouchActions using Elements. The only difference here is that you would need to provide the screen coodinates rather than actual elements on the screen. This approach is useful when the element list in the scroll container is dynamic or unknown. Let us take the same example that we used in TouchActions using Elements to see how this approach works.
Finding the Y Coordinate
To scroll horizontally through the list which contains elements – Top Charts, Categories, Editor’s Choice etc, you would need to provide the coordinates of the starting point and ending point. Since its a horizontal scroll, the Y coordinate would remain the same. You can look up the Y coordinate manually from Appium Inspector using the approach given below –
1) Click on Top Charts, Categories, Editor’s Choice one by one and check its bound property in Appium Inspector. You would notice that the x coordinate changes, but the y coordinate always remains the same. This is because all these elements are at the same height on the screen.
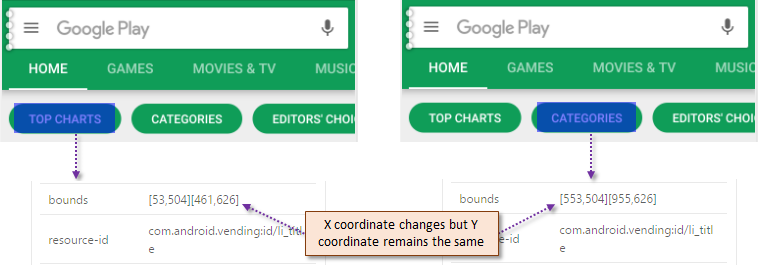

2) For each of these elements, the Y coordinate range is from 504 to 626, so you can manually take any value in between as the Y coordinate to use in your code. The most frequenrly approach is to use the mid point, i.e. (504+626)/2
The above approach mostly works fine, but it might create issues when you are testing the app on multiple devices that too with different screen sizes.
So a better approach would be to figure out the Y coordinate based on the location of any one of the elements in the scroll list. This approach would work fine for any screen size you use. The code for this approach is given below –
MobileElement topCharts = driver.findElement(MobileBy.xpath("//android.widget.TextView[@text = 'Top Charts']"));
Point point = topCharts.getLocation();
int startY = point.y;
int endY = point.y;
Finding the X Coordinate
Since the X coodinate keeps on changing, a good approach would be not base it on element location, but to base it on the screen size. For example, if the mobile screen size is 1200 pixels in width, you can take the X coordinates as 1000 px and 200 px, or 900 px and 300 px. Another approach is to find the middle point, and then add and subtract the some pixels to get the X coordinates, like mid point + 200 px and mid point – 200 px.
We will use the approach where we first find the screen width, and then use it’s 80% and 20% as X coordinates. The logic is given below –
int startX = (int) ((driver.manage().window().getSize().getWidth()) * 0.80);
int endX = (int) ((driver.manage().window().getSize().getWidth()) * 0.20);
Once you get the X and Y coordinates, you can use it in TouchActions code to scroll through the list. The complete code snippet is given below –
MobileElement topCharts = driver.findElement(MobileBy.xpath("//android.widget.TextView[@text = 'Top Charts']"));
Point point = topCharts.getLocation();
int startY = point.y;
int endY = point.y;

int startX = (int) ((driver.manage().window().getSize().getWidth()) * 0.80);
int endX = (int) ((driver.manage().window().getSize().getWidth()) * 0.20);

TouchAction actions = new TouchAction(driver);
actions.press(startX, startY).waitAction(Duration.ofSeconds(2)).moveTo(endX, endY).release().perform();
With this, we have now covered multiple Appium scroll examples using both ToucnActions and UIScrollable. Try using these examples and see which one works best for your test cases. If you have any doubts with any of the methods above, please feel free to contact us using the comments section. Check out our Appium Tutorial series for more articles on Appium.
Is there any other method that you use to scroll in your test scripts? Let us know about it, so that it can be shared with all our readers.