
Welcome to this introductory article on Cucumber BDD with Selenium. This is the first article in our Selenium Cucumber Tutorial series where we will firstly set the context of this tutorial series. This will help you get an idea about the topics that you will read, and what you can expect to learn once you complete this tutorial.


Towards the end of this article, we will also give you some basic insights on Cucumber BDD and its structure. All this will help you to easily relate to the upcoming article in this tutorial series. Let us now start with the first section.
Note: This article is a part of our Cucumber Tutorial series. Head over to our Selenium Cucumber Tutorial main page for the step by step cucumber setup guide
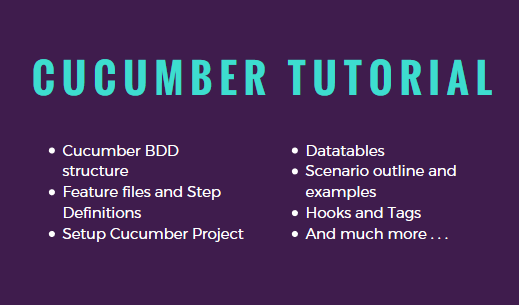
Cucumber BDD – What to expect from this tutorial?
We have divided this Cucumber tutorial series into 2 parts:
-
- Part 1 – Setup: First part of this tutorial deals mostly with the setup. Here, you will learn about how to download Cucumber and Selenium JARs. Then you will use these JARs and create a Cucumber project in Eclipse. Finally, you will use all the basic Cucumber components to write a simple test script.

- Part 2 – Advanced Concepts: In this section, you will move beyond all the basic stuff and learn about some advanced topics. Although we are calling these as advanced topics, but these are some of the most commonly used cucumber concepts that help you write better tests. These include topics such as – datatables, scenario outlines, examples, backgrounds, tags and hooks.
What is BDD?
In very simple terms, BDD or behavior-driven development, is a technique where your specifications or test cases are written in plain english like sentences. With this approach, the non-technical team members find it easy to understand the flow and collaborate more in the process of software development. Let us understand this with the help of a simple example.
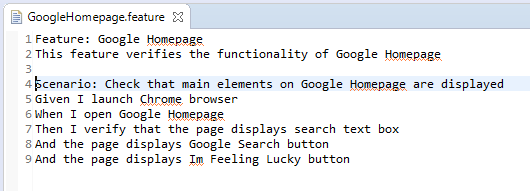
Consider a scenario where you want to test Google Homepage. One of the test scenarios will be to verify that the page displays all the main elements. As part of a test case, let us say that you want to check that the homepage displays the search text box, “Google Search” button and “I’m Feeling Lucky” button. With BDD, you can write this test scenario in the below format:
- Given I launch Chrome browser
- When I open Google Homepage
- Then I verify that the page displays search text box
- And the page displays Google Search button
- And the page displays Im Feeling Lucky button
Why Cucumber?
There are multiple behaviour-driven development tools such as Cucumber, Concordion, SpecFlow, JDave etc, that let you write your test cases in the format given in the previous section. Out of these, Cucumber is one of the most popular tools because of the reasons given below:
1. Cucumber BDD is open source and hence, its free to use
2. With Cucumber, you can write your test scripts in multiple languages such as Java, Ruby, .NET, Python etc
3. Cucumber easily integrates with Selenium, Ruby on Rails, Watir and other web based testing tools
4. Cucumber is one of the most widely used BDD tools. Due to this, you will find lots of online tutorials and forms to help you with your doubts and queries.
Let us once again have a look at the Google Homepage scenario that we have discussed in the previous section. Once you complete the first part of our tutorial series, you will be able to write this scenario in Cucumber BDD format as shown in the below image:

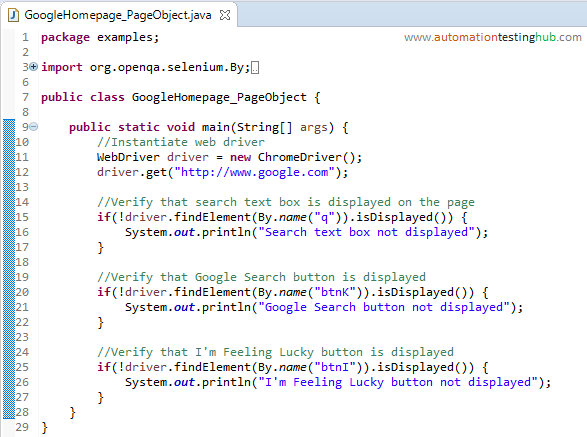
The Java equivalent of this scenario is also given below:

You would be thinking as to how the english representation of a test case is related to the actual code. Well, you will get to know about this in the next section.
How Cucumber BDD works?
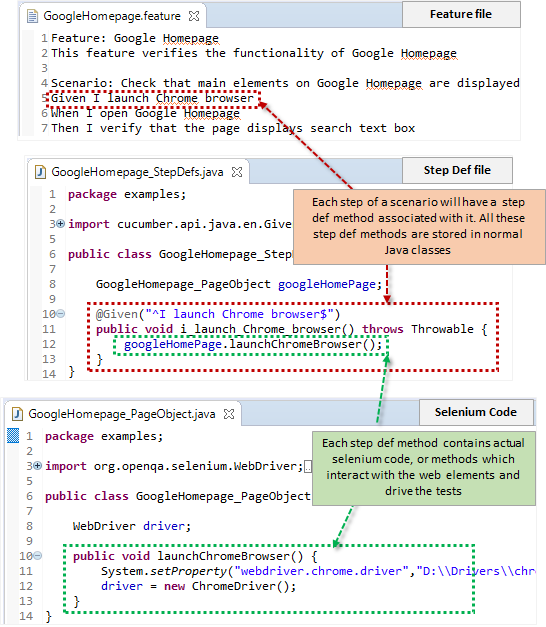
This is the last section of this article where we will talk about the structure of a Cucumber based setup and how this structure works. In a Cucumber based setup, there are 3 basic components that you will use in your automation framework. These 3 components are:
- Feature file
- Step definitions file
- Actual code that interacts with the elements on a webpage
Let us now have a quick look at each of these components.
Feature file: In Cucumber, the english representation of test cases is written in a file known as the feature file. In testing world, you can think of the feature file as a logical grouping of test cases. This means that the feature file is equivalent to a test set.
Each feature file can contain multiple scenarios. A scenario can be thought of as a test case. Each scenario itself has multiple steps written in the form of Given, When and Then formats.


Step Definitions file: Step definitions, or step defs in short, are the methods behind each step in a scenario. For every line or step that you add in a scenario in features file, Cucumber will require a method or a definition using which it knows as to what operations it needs to perform for that step in the scenario. There is a specific format in which you need to write step defs. We will cover this later in this tutorial when we will work on our test scripts.
Actual code that interacts with web elements: This is the actual Selenium code that interacts with the webelements and drives your test scripts. You have to write these methods in different classes in the normal way that you do with Selenium. The only additional point here is that you will invoke these methods in the step defs, so that Cucumber knows as to what actual actions it needs to perform as part of a step definition method.
Check this below image which will provide you more clarity on how feature file, step defs and actual selenium code are related.

With this, we now complete the first article in our Cucumber BDD tutorial series. If you have any doubts with any of the concepts that we have mentioned above, then please feel free to contact us using the comments section.
Next Article: Download and install Java (if you don’t have Jave 8)