
Welcome to the most important article on mobile element identification where you will learn how to inspect mobile elements using Appium Dekstop Inspector. This article is a continuation of our previous article on mobile element identification – part 1 where you learnt about how to start Appium Desktop Inspector and setup the desired capabilites to allow Appium to communicate with your mobile browser.
Inspect mobile elements – Scenario to be automated
To understand mobile browser element identification in an easier way, let’s take up a small scenario which we will try to automate. For each of the steps in the scenario, we will try to come with different ways using which the element can be identified. The scenario which we will try to automate is given below –
- Launch Chrome browser on your mobile device
- Open Google Homepage on Chrome browser
- Type ‘Google’ in the search box
- Click on Search button
- Print on console, the details of the first search result
We have already covered points 1 and 2 in our previous article on how to identify mobile browser elements with Appium – Part 1. So let us now start with the 3rd step.
Identify Google Search box in mobile browser using Appium Desktop Inspector
Follow the steps given below to identify the properties of Google search box –
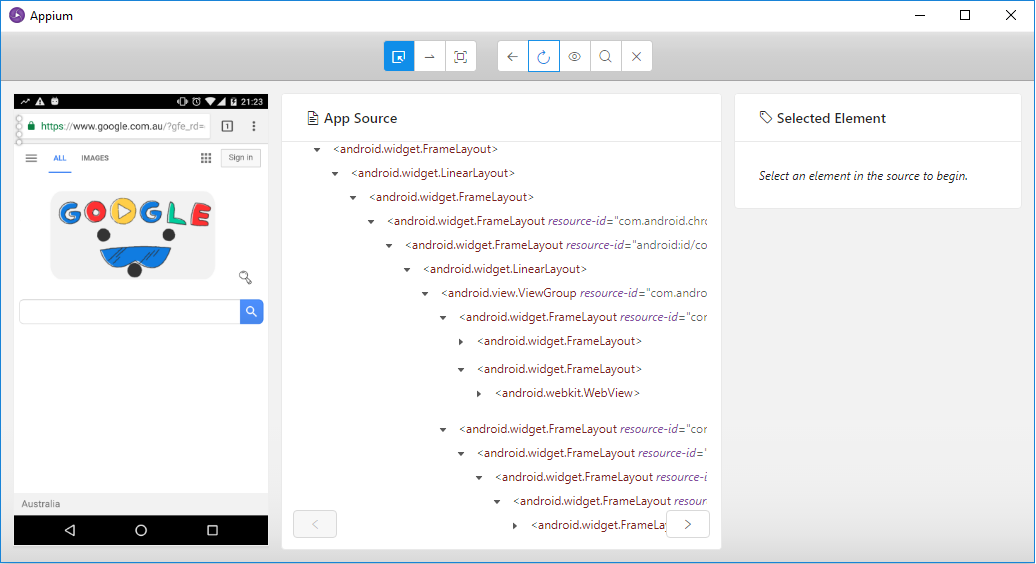
1. Make sure that Google Homepage is displayed in Appium Desktop Inspector. The detailed steps to do this have already been provided in our article on mobile element identification – part 1. You can revisit that article in case of any confusion.
The Appium Desktop Inspector window will look something like this –

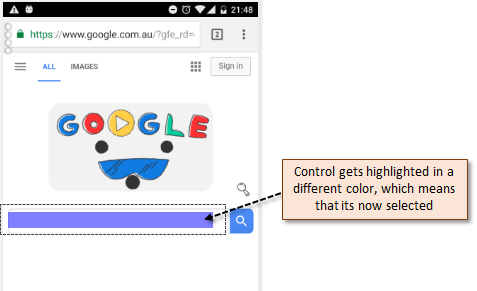
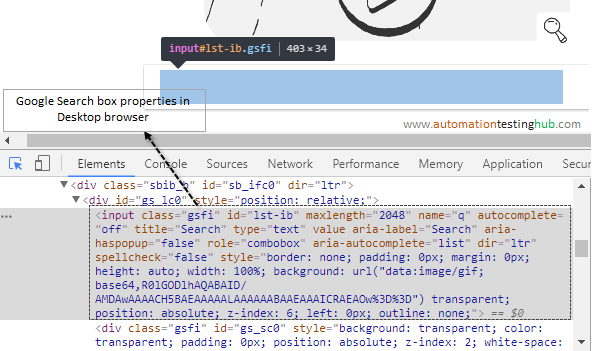
2. In Appium Desktop Inspector, click on the search text box. You will see that it gets highlighted in a different color.

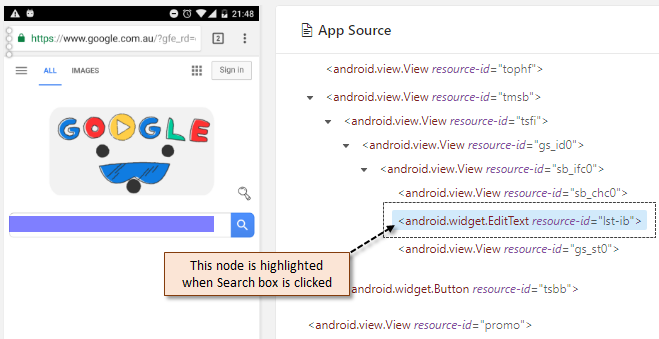
3. The App Source section shows the complete object hierarchy dump of the webpage that you have opened. Once you select any control in the inspector, the corresponding node in App Source also gets selected. In the App Source section, click anywhere on the white space so that the section gets activated. Now use your keyboard arrow keys to scroll down to the node which got highlighted when you clicked on the Search box. This is shown in the below image –

4. The last section in Appium Desktop Inspector is the Selected Element section. This section shows all the properties of the control which you have selected. It is from this section that you have to choose the property using which you will identify the element.


Let us now have a look at the different properties that you can use to identify this control.
Different ways to identify Google Search box
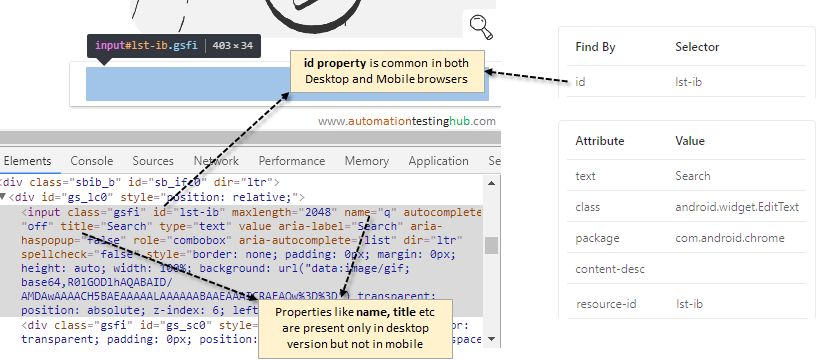
First of all, have a look at the below image which shows the mapping of different locators and find element methods. This is just a easy way to figure out as to which find element method is used with which locator.
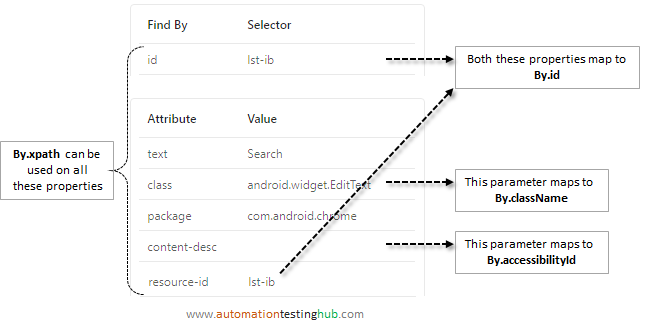

Important Note: Please note that in the above image we have only added the properties which are most commonly used to identify the mobile element. If you can’t identify the elements using any of these locators or identifiers, then you would most probably have to go with XPath.
Using the above image as reference, let us have a look at the different ways using which Google search box can be identified. The code for this is given below.
//Find element using ID property
driver.findElement(By.id("lst-ib")).sendKeys("Google");

//Find element by Class Name -- The below line of code will NOT work
driver.findElement(By.className("android.widget.EditText")).sendKeys("Google");

//Find element using Xpath -- First line of code will NOT work. Second will work
driver.findElement(By.xpath("//android.widget.EditText[@id = 'lst-ib']")).sendKeys("Google");
//OR
driver.findElement(By.xpath("//*[@id = 'lst-ib']")).sendKeys("Google");
Note 1:
In the above lines of code, some statements have been marked as – code will NOT work. Why this code won’t work? You will see that in the next section. For now, if you try using the code marked as NOT working, then you will see NoSuchElementException when you run the code.
Note 2: The process of using xPath is same as that in Selenium. So you can use any valid xpath combination here.
Note 3: Since the content-desc property is blank, hence we cannot use it in this case.
As of now, we have identified the Google search box using the properties that are exposed by Android via Appium Desktop Inspector. You would have observed that the properties shown in Appium Desktop Inspector are bit different from the properties that you see in the desktop browser version.
This means that Desktop version of this control shows some additional properties which are not displayed when you identify the same control using mobile browser. But since Appium is built on top of Selenium, this allows you to use all those Desktop based properties as well which are not in mobile version. In a nutshell, his means that you can identify a control using both mobile and desktop browser based properties. Let’s understand this with the help of below example.
Identify Google Search box using Desktop browser based properties
This is the standard Selenium approach where you identify the properties of an object on Desktop browser. Follow the steps given below to inspect the search box –
1. Open Chrome browser in Desktop and then open Google Homepage
2. Now click on F12 so that Developer tools window is displayed
3. Inspect Google Search box to view its properties. This should look like the image as displayed below –

4. Did you observe that Desktop version provides many additional properties which are not provided by mobile browser? Also there are some properties which are identified differently. For example, from the below image you can see that the element in Desktop browser is defined as “input” but in mobile browser its called “android.widget.EditText”. Also, there are properties like name, title, aria-label etc which are present in Desktop version but not in mobile.

As we had mentioned above, Appium is built on top of Selenium and it uses a lot of Selenium based functionality. Hence, the objects that you identify from desktop browser would work with mobile browser as well, even though you won’t see these properties in Appium Desktop Inspector. So go ahead and identify the Google search box in the conventional way w.r.t Selenium. We have given few of the identification methods below –
//Find element by Class Name
driver.findElement(By.className("gsfi")).sendKeys("Google");

//Find element by Name
driver.findElement(By.name("q")).sendKeys("Google");

//Find element by XPath
driver.findElement(By.xpath("//input[@id = 'lst-ib']")).sendKeys("Google");
Do you remember that in the previous section, we had marked couple of lines of code that will NOT work? The explanation for that is given here. Now you might have observed that both desktop and mobile versions have class property to identify the search box. But the problem that arises here is that the value of class property is different in both browsers.
In desktop version, class property has value “gsfi” and in mobile, this value is “android.widget.EditText”. In case of such a conflict, selenium based identification would have higher precedence over appium based identification. Due to this reason, the lines of code containing “android.widget.EditText” in the previous section won’t work.
Now, combining both Desktop and Mobile based properties, you get the below different ways using which you can identify Google search box in your Appium test script (please note that we have not included the NOT working mobile identifcation code in the below lines of code).
// ---------- Mobile browser based identification ----------

//Find element using ID property
driver.findElement(By.id("lst-ib")).sendKeys("Google");

//Find element using Xpath
driver.findElement(By.xpath("//*[@id = 'lst-ib']")).sendKeys("Google");

// ---------- Desktop browser based identification ----------

//Find element by Class Name
driver.findElement(By.className("gsfi")).sendKeys("Google");

//Find element by Name
driver.findElement(By.name("q")).sendKeys("Google");

//Find element by XPath
driver.findElement(By.xpath("//input[@id = 'lst-ib']")).sendKeys("Google");
Preferred method to identify controls for mobile browser execution
Looking at how we identified Google search box, we can say that the below statements hold true –
- Elements can be identified using both Desktop browser and mobile browser
- The properties with which an element is identified might differ on desktop and mobile browsers
- In case of properties which are common in both desktop and mobile browsers, such as class name, the desktop based property takes precedence
Keeping the above points in mind, we give you the approach using which you should identify the elements for mobile browser execution –
- Open the webpage on both desktop and mobile browsers to see if objects are common or if there are objects which are specific to mobile browsers
- For all the common objects, identify them using Desktop browser properties. These will work on mobile as well without any issues
- For mobile specific elements, use Appium Desktop Inspector to identify these elements using your mobile browser
With this approach in place, let us now identify the remaining objects to complete our test script.
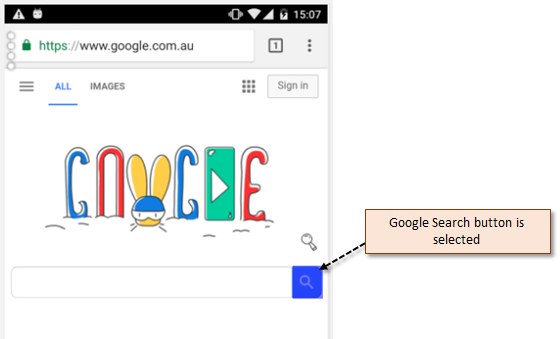
Identify Google Search button
As we had discussed before, the Search box on Google Homepage is different in desktop and mobile browsers. So in this case, we will use Appium Desktop Inspector to identify the control on the mobile browser. The below steps show how you can identify the Search button –
1. Make sure that Google Homepage is displayed in Appium Desktop Inspector
2. In Appium Desktop Inspector, click on the Search button. You will see that it gets highlighted in a different color

3. The App Source and Selected Element sections will show the properties on the Search button
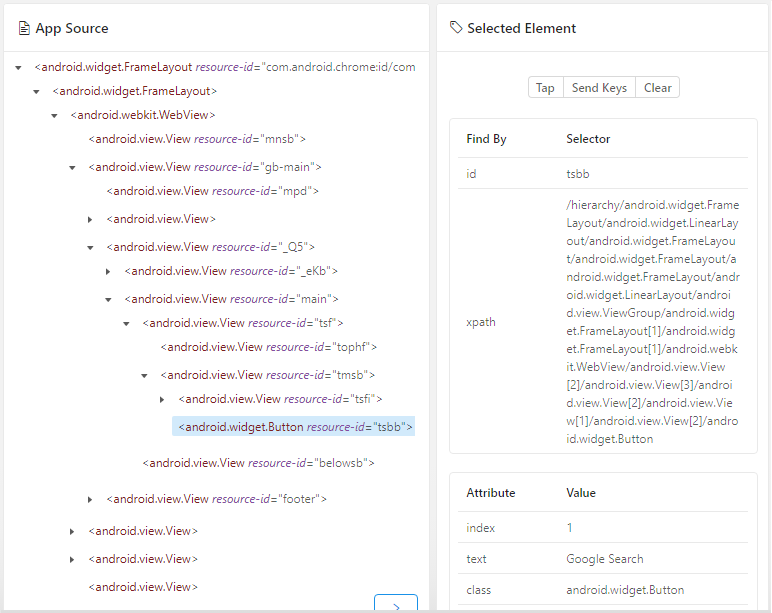

4. Like we did for Google Search text box, we can identify the properties of the search button as well. Below code shows the different ways in which the button can be identified
//Find element using ID property
driver.findElement(By.id("tsbb")).click();

//Find element using XPath
driver.findElement(By.xpath("//*[@id = 'tsbb']")).click();
Identifying the first search result
As per the approach we had mentioned in the previous sections, we will identify the search results using Desktop browser because its common to both Desktop and mobile browser. Below image shows the object properties and the identifier that we are using to identify this element.
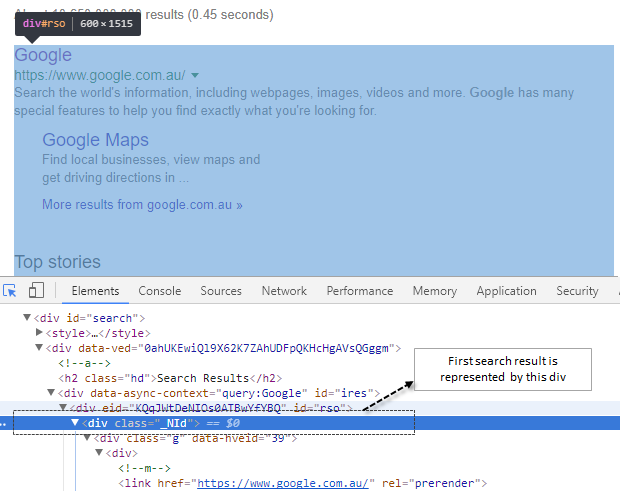

//Identifier for the first search result block in Google
driver.findElement(By.xpath("//div[@id = 'rso']/div")).getText()
Please note that here, we have identified only the top level element for the first search result. If you want you can identify the induividual elements (heading, url etc) as well.
Combine all code to create the complete test script
Since we have now identified all the controls needed for our test script, let us now add this code to our script which launches Chrome browser and opens Google Homepage. You can find this code in our article on launching Chrome browser on mobile device. The complete test script is given below:
package browser_tests;

import java.net.MalformedURLException;
import java.net.URL;

import org.openqa.selenium.By;
import org.openqa.selenium.remote.DesiredCapabilities;
import io.appium.java_client.AppiumDriver;
import io.appium.java_client.MobileElement;
import io.appium.java_client.android.AndroidDriver;

public class ChromeTest {

	public static void main(String[] args) {

		//Set the Desired Capabilities
		DesiredCapabilities caps = new DesiredCapabilities();
		caps.setCapability("deviceName", "My Phone");
		caps.setCapability("udid", "ENUL6303030010"); //Give Device ID of your mobile phone
		caps.setCapability("platformName", "Android");
		caps.setCapability("platformVersion", "6.0");
		caps.setCapability("browserName", "Chrome");
		caps.setCapability("noReset", true);

		//Set ChromeDriver location
		System.setProperty("webdriver.chrome.driver","C:\\selenium_drivers\\chromedriver.exe");

		//Instantiate Appium Driver
		AppiumDriver driver = null;
		try {
			driver = new AndroidDriver(new URL("http://0.0.0.0:4723/wd/hub"), caps);

		} catch (MalformedURLException e) {
			System.out.println(e.getMessage());
		}

		//Open URL in Chrome Browser
		driver.get("http://www.google.com");

		//Search for the text 'Google'
		driver.findElement(By.name("q")).sendKeys("Google");
		driver.findElement(By.id("tsbb")).click();

		//Print details of the first result on Console
		System.out.println(driver.findElement(By.xpath("//div[@id = 'rso']/div")).getText());
	}
}
Before you run this test script, please make sure that you replace the desired capabilities and chromedriver location (lines 19, 20, 21 and 26) as per your device. Once you run this test script, you will see that it launches the Chrome browser and then performs all the actions that you have specified in the test script.
With this, we complete this tutorial series on executing automation scripts on Chrome browser on a mobile device. This tutorial series covers all the basic details that would help you get up and running with the Appium setup. Going forward, we will work on some advanced Appium related articles as well. For now, if you face any issues with any of the steps mentioned in this tutorial, then please feel free to get in touch with us using the comments section.