
Welcome to our mini tutorial series on Cucumber data driven testing. In this mini tutorial, you will learn about all the different ways using which you can write Cucumber data driven tests.
What is Cucumber data driven testing?
First things first. What do we mean by data driven testing in Cucumber? In very simple terms, cucumber data driven testing means that you can pass data from cucumber feature files to your test cases. For example, let us consider that you are automating the login flow of some application. In this case, you can pass user name and password as test data from your feature file to selenium code.
Note: This article is a part of our Cucumber Tutorial series. Head over to our Selenium Cucumber Tutorial main page for the step by step cucumber setup guide
There are multiple types of data that you can pass through feature files. For example, you can pass one or more string values, numeric values or complete data tables as well. We will cover all these variations in this mini tutorial on Cucumber data driven testing.
Data driven testing concept to be covered in this article
In this first article, we will cover the very basics of Cucumber data driven testing. We will write a scenario to search for some text on Google homepage, where we will pass this search string to the code as a parameter.
The scenario that we will automate is given below –
Scenario: Perform search operation on Google Homepage
Given I launch Chrome browser
When I open Google Homepage
Then I search for "weather tomorrow" on Google
If you check the last line in the above scenario, you will notice that we have added double quotes around the string ‘weather tomorrow’. Whenever you write any text in double quotes, Cucumber will treat it as a string parameter. And this is one of the simplest examples of Cucumber data driven testing.
Once you have a look at the step definition method for this data driven step, you will get a much better idea on how all this works. So, let us now start writing this test script.
Add new Cucumber feature file for data driven tests
We will reuse the same basic framework that we created in part 1 of our Cucumber Selenium tutorial. Also, we will not add complete step by step details on how to add feature files, step definition methods and runner classes, as we have already covered all this in detail in part 1 of our tutorial.
If you need a refresher on any of these concepts, I encourage you to check out the relevant link from our Cucumber Selenium tutorial. Let’s now add the feature file for this test case.
1. Open CucumberTutorial project which you had created in part 1 of this tutorial series
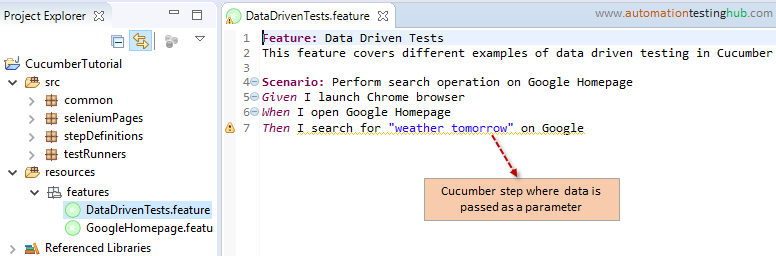
2. Add a new feature file named DataDrivenTests.feature in resources > features folder
3. Add the below content (feature description and scenario) to the feature file
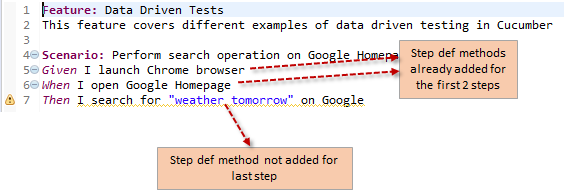
Feature: Data Driven Tests
This feature covers different examples of data driven testing in Cucumber

Scenario: Perform search operation on Google Homepage
Given I launch Chrome browser
When I open Google Homepage
Then I search for "weather tomorrow" on Google
In Eclipse, the feature file would look like this –

Let us now add a new test runner for this feature file.
Add new test runner class for the data driven feature file
You can follow the steps given below to add a test runner class for this feature file –
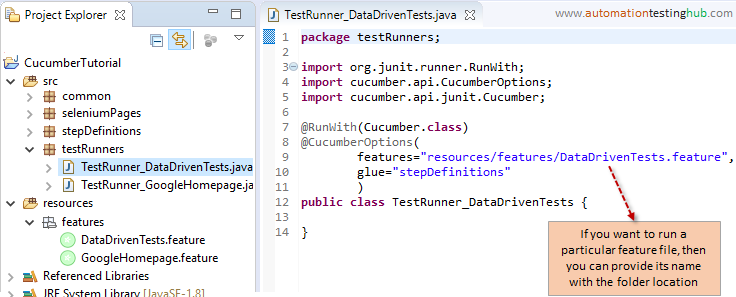
1. In src > testRunners folder, add a new runner class with name TestRunner_DataDrivenTests
2. Add the below code to this runner class
package testRunners;

import org.junit.runner.RunWith;
import cucumber.api.CucumberOptions;
import cucumber.api.junit.Cucumber;

@RunWith(Cucumber.class)
@CucumberOptions(
		features="resources/features/DataDrivenTests.feature",
		glue="stepDefinitions"
		)
public class TestRunner_DataDrivenTests {

}
Important Note: If you check the above code, you will see that we have added the feature name as well to the features path. This is because in resources/features folder, we now have two feature files. If you keep the path as just resources/features, then cucumber will execute both the feature files present in this folder.
Since we want to run only the data driven tests, so we specify the feature file name as well with the folder location. This way, cucumber will only run one feature file.
You will see that the test runner class now looks like this –

With the test runner class created, let us now run this class to find out the missing methods that we need to add to the step definition class.
Run Cucumber test runner class
If you check the data driven scenario once again in the feature file, you will notice that we have already added step definition methods for the Given and When statement. We had added this while working on part 1 of our tutorial series.

So, you have to now only add the step definition method for the last step in the scenario. And this is the step where we have added data parameterization. We can do it in the following 2 ways –
- Run the complete scenario using test runner class. Since the first two steps already have step definition methods, cucumber will run these steps. And then when it finds that the last step doesn’t have a step def method, it will list the missing step definition method on the console
- Comment the first two steps in the feature file by adding # symbol at the beginning of the steps. Now when you run the test runner class, cucumber will not execute the first two steps as you have commented these. Cucumber will just execute the last step and will provide the missing step definition method on the console
Let us follow the first method and run the test runner using the steps given below –
1. Right click anywhere inside TestRunner_DataDrivenTests class and select Run As > JUnit Test
2. Cucumber would start executing the test case. Since you have already implemented the first 2 steps, cucumber will launch Chrome browser and open Google Homepage URL
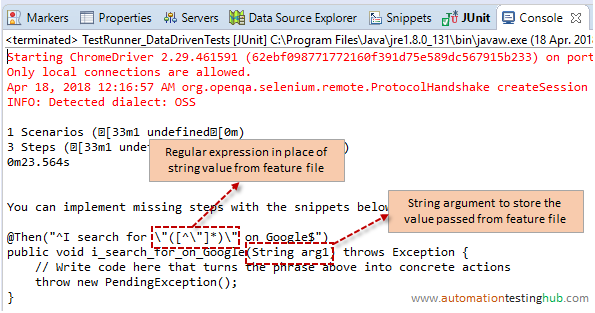
3. For the last step, it will show the missing step method on console as shown below
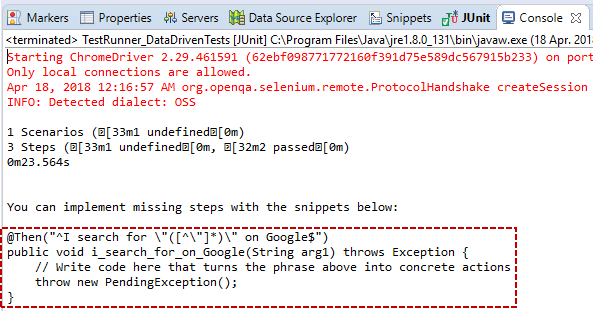

You can now copy this method and add it to your step definition class. Before we do this, let us have a quick look at this step definition method.
Closer look at step definition method which contains String parameter
If you carefully look at this method, you will notice that it contains 2 distinct features –
- Cucumber has replaced our search parameter – weather today, with a regular expression
- Cucumber has also added a string argument – arg1, in the method definition

Using regular expression and method arguments is Cucumber’s way of working with data parameters. Whatever data parameter you provide in the feature file, Cucumber makes it available to you in the code using this string argument. In our case, arg1 will contain the value ‘weather today’. This now becomes a simple string variable which you can use it in your test case.
Now you know how cucumber passes data parameters from feature file to your java code. Let us now add this method to the step definition class and then write the selenium logic which will perform the search operation on Google.
Add this method to a new step definition class
Follow the steps given below to add this method to the step definition class.
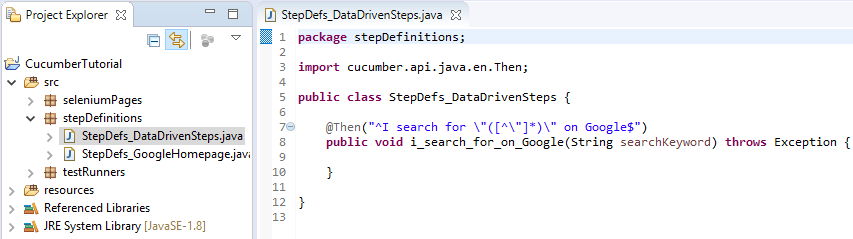
1. In src > stepDefinitions package, add a new class with name – StepDefs_DataDrivenSteps
2. Copy and paste the step def method to this class
3. Resolve the dependencies and delete the code that currently present inside this method. Also, change arg1 to something meaningful such as searchKeyword
Now, the step definition class would look like this –

Let us now add the selenium code to drive this method.
Add Selenium code to search the keyword on Google
Adding selenium logic is pretty straightforward as shown below –
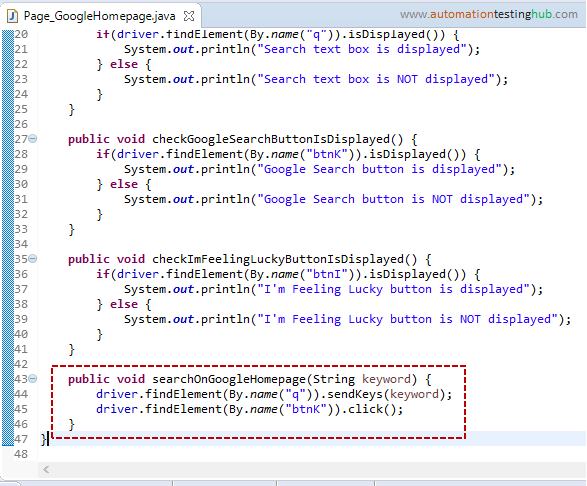
1. Add a new method in src > seleniumPages > Page_GoogleHomepage class. This method would enter the string in search box and click on Search button
For this example, we have created a method searchOnGoogleHomepage as shown below
public void searchOnGoogleHomepage(String keyword) {
	driver.findElement(By.name("q")).sendKeys(keyword);
	driver.findElement(By.name("btnK")).click();
}

2. Call this method from the step definition class and pass the data parameter to it as shown below
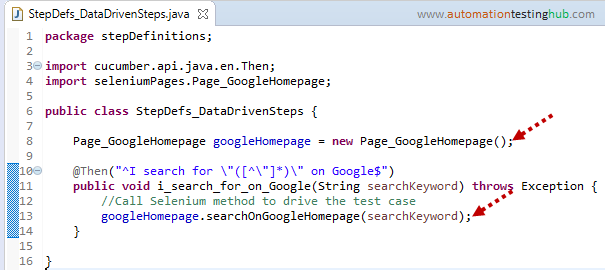

With this, we have now completed the test script for this scenario. Let us now run this test case to see if it works fine.
Run Cucumber data driven test
To run this test case, simply open TestRunner_DataDrivenTests class, and run it as a JUnit test. You will see that the script opens Google Homepage and searches for the string ‘weather today’. To make sure that this data driven test works correctly, change the parameter from ‘weather today’ to something else of your choice in the feature file. Now when you run the test again, you will see that the script will search for this new string on Google.
With this we have completed our first basic cucumber data driver test. There is much more to be discussed, which we will cover in our upcoming articles in this tutorial.
If you have any doubts with any of the concepts mentioned in this article, or any other feedback for us, then please feel free to get in touch with us using the comments section.
Next Article: More practical examples of Cucumber data driven tests