
This article is a continuation of our previous one on Appium Desktop Inspector, where you learned about how to connect Appium Desktop Inspector to your mobile device. The article explained in detail, the process of setting up Desired Capabilities using which the Inspector can launch the mobile app on your device.
In this article, we will cover the next steps, i.e., you will learn how to inspect mobile elements using Appium Desktop Inspector. If you have followed our Appium Tutorial series, then you would remember that we have already done a similar article which used UIAutomatorViewer. Do you think the concepts in this article will be any different from what we had mentioned for UIAutomatorViewer? Let’s first figure this out.

Is mobile inspection method similar in Appium Desktop Inspector and UIAutomatorViewer?
Well, the short and sweet answer to this question is – Yes. The way you inspect elements in mobile app is exactly the same in UIAutomatorViewer and Appium Desktop Inspector. The are slight differences in the UI of both the tools, but the underlying logic of identifying elements remains the same. Appium Desktop Inspector uses the same methods as UI Automator Viewer to identify the elements in your mobile app –
- Find element by ID
- Find element by ClassName
- Find element by Tag Name
- Find element by Accessibility ID
- Find element by XPath
Also, the properties of the mobile elements, such as resource-id, content-desc, text etc, will be same in both the tools. Hence in this article, we will only cover the main differences that are there in these two tools. This will give you some context on both the tools and will help you decide which tool you want to use.
Try it Yourself Activity 1: Go through our previous article on inspecting mobile elements using UIAutomatorViewer. Read about the different ways using you can identify mobile elements. Try the same approach with Appium Desktop Inspector and see if you can identify the elements on the first screen.
Since the process of identifying elements is exactly the same, so we will not cover those steps again. Instead what we will look at is the differences between both the tools in terms of UI and other things. These differences are given in the below section.
Difference 1: The way you launch mobile app screen in both the inspectors
UIAutomatorViewer: With this tool, you have to open the app on your mobile device first. Then you just inspect the mobile screen using UIAutomatorViewer. This way the tool will inspect any app that is currently displayed on your screen.
Appium Desktop Inspector: This tool works in a different manner. Here you provide the details of your mobile app as part of the Desired Capabilities. And when you launch the inspector, then the inspector itself will open the mobile app on your device.
So here, you can say that using UIAutomatorViewer is easy and quick, because you don’t have to provide all the details about your mobile device and the app that you want to inspect.
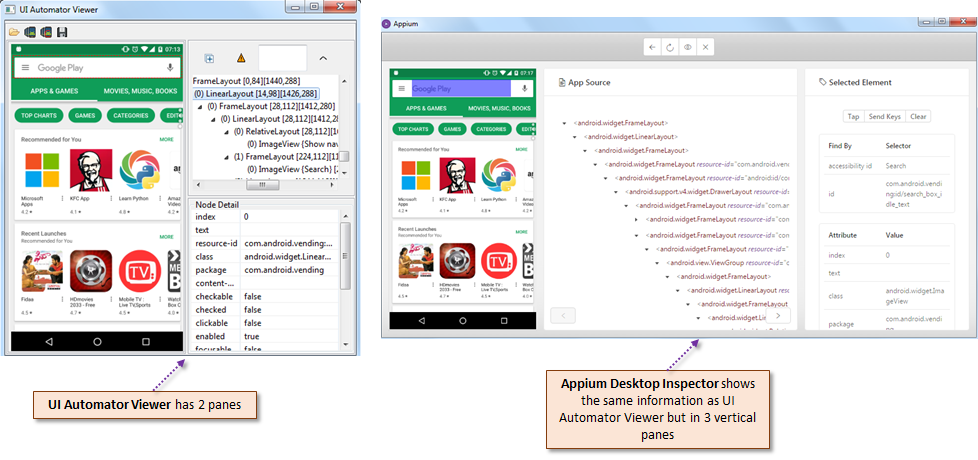
Difference 2: UI Layout is bit different
UIAutomatorViewer has 2 primary panes. First pane shows the screenshot, and then second one shows the object hierarchy as well as the selected element’s details. On the other hand, Appium Desktop Viewer has 3 panes. Object hierarchy and selected element’s details are displayed in two different panes.
The number of panes and the way in which the elements are displayed don’t matter much. But at this moment, UIAutomatorViewer fares better. This is because Appium Desktop Inspector is not that easy to use especially in terms of navigation. You will not be able to scroll down on the element details pane. Also, scrolling vertically and horizontally in the object hierarchy pane is bit of a pain.
These minor UI differences will mostly get resolved in the future versions of Appium Desktop. And we should hopefully start seeing more and more good features get added to Appium Desktop Inspector.

Difference 3: Appium Desktop Inspector lets you interact with the mobile app
This is a feature that’s only available in Appium Desktop Inspector, where it lets you interact with the mobile app. Let us see how this works –
1. Open Appium Desktop Inspector and launch Google Play Store app with it (The detailed steps for doing this were covered in our previous article on the basics of Appium Desktop Inspector, in case you want to have a look)
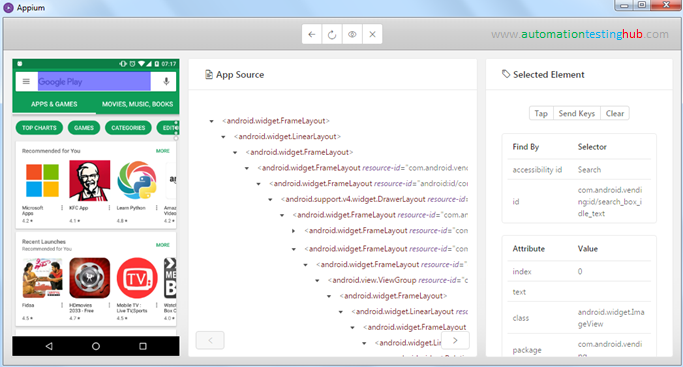

Now let us assume that you want to tap on Google Play search box and then type Google in there.
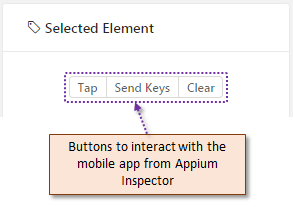
2. To do this, click on Google Play search box in Appium Desktop Inspector. The Selected Element pane would show the details of the element that you have just selected. Notice that this pane has 3 buttons at the top – Tap, Send Keys and Clear. All these three buttons can be used to perform actions on the mobile app.

3. Now, click on Tap button. You will see that the screenshot will start getting refreshed. And after a few seconds, it will show the Search Google Play search text box, as shown in the below image
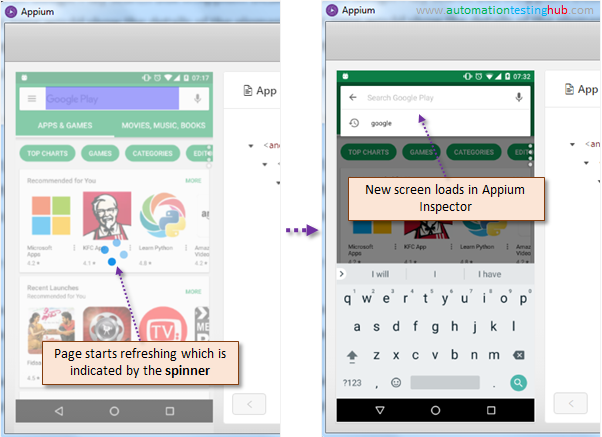

Have a look at your mobile device. You will notice that the action (of clicking on the search box) has been performed on your device as well.
4. Now click on Search Google Play text box from the screenshot pane, so that this element gets displayed in the Selected Element pane
5. We now have to enter ‘Google’ in this text box. To do this, click on the SendKeys button. It will open a popup window as shown below
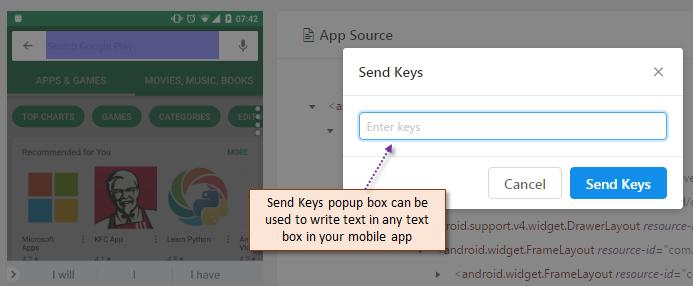

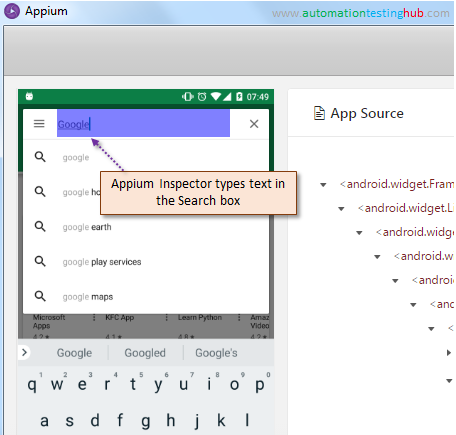
6. In this popup window, enter the text as ‘Google’ and click on Send Keys button. The screen in mobile app would again get refreshed and you would see that the text ‘Google’ has now been typed in the Search box. The same thing will happen on your actual device as well.

This way, you can interact with different elements on your mobile app using Appium Desktop Inspector. Although, the ways with which you can interact with the mobile app are very limited but its still a very useful feature. We will see why this approach is useful in the next section.
Difference 4: UIAutomatorViewer needs a refresh every time you have a new screen to inspect
With UIAutomatorViewer, you will have to inspect the whole screen again when you want to check a new screen in your mobile app. To do this, you will first have to navigate to your new screen directly from your mobile device. After this you will have to click on Device Screenshot button in UIAutomatorViewer so that it refreshes and shows you details of the new screen.
But with Appium Desktop inspector, you would not need to follow the above approach. This is due to the fact that you can move to different screens from within Appium Desktop Inspector using the Tap function. This way you can easily navigate to new screens and Appium Desktop Inspector view will get refreshed on its own.
Difference 5: Appium Desktop Inspector shows couple of Find By ids at the top
Appium Desktop Inspector makes it easy for you to identify the properties of elements in your mobile app. In our article on inspecting mobile elements using UIAutomatorViewer, you would have seen that content-desc property can be used as Find by Accessibility Id and resource-id can be used as Find by Id in Appium.
Appium Inspector goes one step further and shows these two properties at the top, so that it becomes easier for you to identify the control. Have a look at couple of scenarios given below –
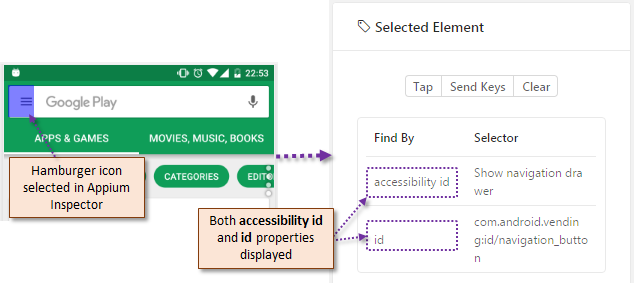
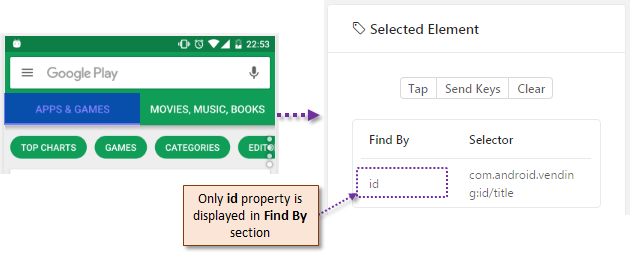
Scenario 1: Inspect the Hamburger icon that is displayed just before the Search box. You will see that Appium Desktop Inspector shows a Find By section, where it displays both the accessibility id and id properties. Please note that these values are also available in the bottom part of the section with their correct property names – content-desc and resource-id. Showing it at the top is a quick way of displaying the exact property that has to be used with Appium.

Scenario 2: Now, inspect the APPS & GAMES section. This time you will notice that Appium only shows the id property at the top. This is because this element has content-desc property as blank and hence it’s not displayed in the top list.

Difference 6: Appium Desktop Inspector shows Xpath as well
This is another important feature in Appium Desktop Inspector which you will not find in UIAutomatorViewer. Appium Desktop Inspector shows you Xpath of the elements where both resource-id and content-desc properties are blank. There are no good examples about this in Google Play Store app. But if you find any elements which doesn’t have both these properties, then the inspector would show the Xpath which would look like this –
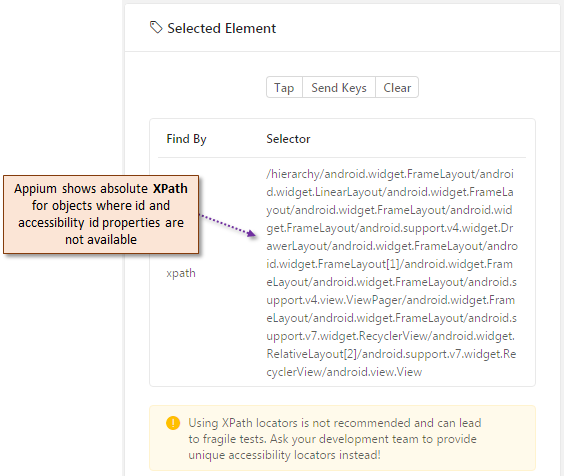

Although its not available in UIAutomatorViewer, but we feel that its half baked feature in Appium Desktop Inspector. This is because it always shows you the absolute Xpath, which is not at all a good way to identify an element on the screen.
This was all about identifying elements on your mobile app using Appium Desktop Inspector, and its differences with UIAutomatorViewer. Before finishing this article, we have one more quick activity for you to try out.
Try it Yourself Activity 2: Go through our previous article on inspecting mobile elements using UIAutomatorViewer once again. Check out the automation scenario that we have provided there. Now try to see that you can identify the same elements from that scenario using Appium Desktop Inspector. You would be able to notice that the element properties are displayed exactly the same in Appium Desktop Inspector also.
Try out the above activity and let us know if you face any issues. Also, please feel free to share your feedback about our articles. Your comments and feedback would help us improve our articles and make it more useful to all our readers.