

Welcome to Appium Inspector Tutorial – Part 2. This article is a continuation of our previous article on Appium Inspector, where you learned about UIAutomatorViewer. The previous article covered the very basics of UIAutomatorViewer such as how you can open it, and how you can inspect your mobile app.
In this article we will go forward one more step and dive deep into the various concepts of mobile element identification, and show how you can inspect elements in your mobile app using different ways. We will also show how you can incorporate these steps in your test scripts. Let us first start with looking at the different ways using which you can identify elements in your mobile app.
Different ways to identify elements using Appium
Appium provides few different ways to identify mobile elements. If you are familiar with Selenium, then you can see that most of these identification methods are same as that in Selenium WebDriver. These identification methods are given below –
- Find element by ID
- Find element by ClassName
- Find element by Tag Name
- Find element by Accessibility ID
- Find element by XPath
The below image shows these element identification methods in Eclipse IDE. Please note that the below image shows shows some methods which are striked out. This is because these methods are not available to be used in the newer versions of Appium. These methods are still displayed simply because Appium is built on top of Selenium Webdriver. Selenium uses these methods, so these are exposed to Appium as well.
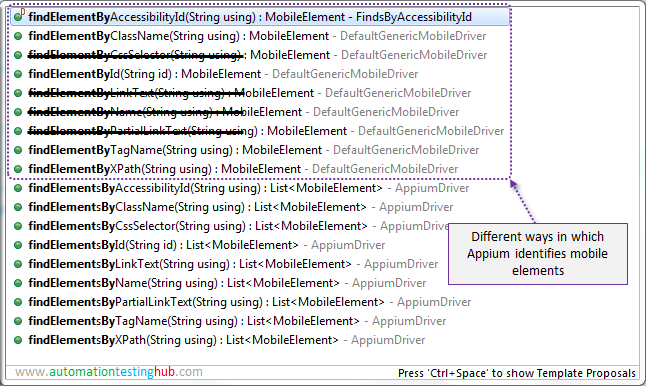
But if you try to use any of the striked out methods, you will see InvalidSelectorException. For example, if you try to use findElementByName() method, you will get InvalidSelectorException: Message: u”Locator Strategy ‘name’ is not supported for this session” exception.
To understand element identification using UI Automator Viewer, let us take a small scenario which we will try to automate. We have described this scenario in the next section.
Automation scenario to identify elements using UIAutomatorViewer
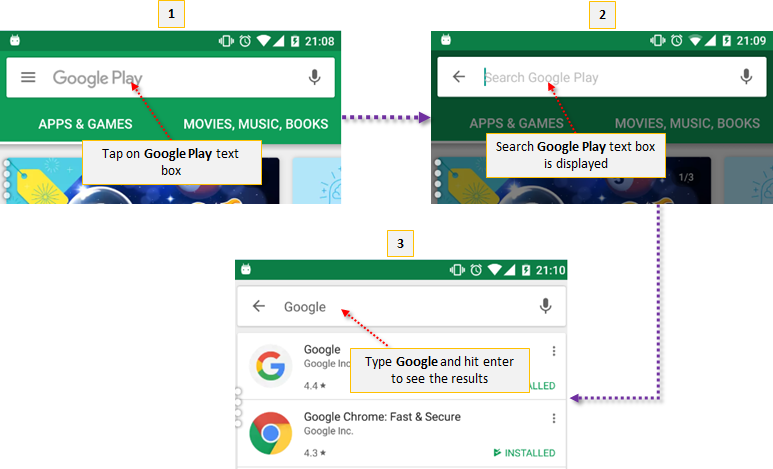
In this article, you will learn how to automate the below scenario –
- Open ‘Google Play Store’ app in your mobile device
- Tap on ‘Google Play’ text box
- ‘Search Google Play’ text box would appear
- Enter ‘Google’ in the text box and tap on enter key on your keyboard to display the search results
The first step given above has already been covered in our article – First Appium Test Script. We will just reuse the code from that article and then add the new functionality to it.

Let us now start with identifying the first control.
Use UI Automator Viewer and Inspect the first element
Follow the steps given below to inspect the first element from the mobile app –
Please Note: The first four steps are not detailed out. If you feel bit confused about any of these steps, then please revisit Appium Inspector Tutorial – Part 1, where these steps are explained in detail.
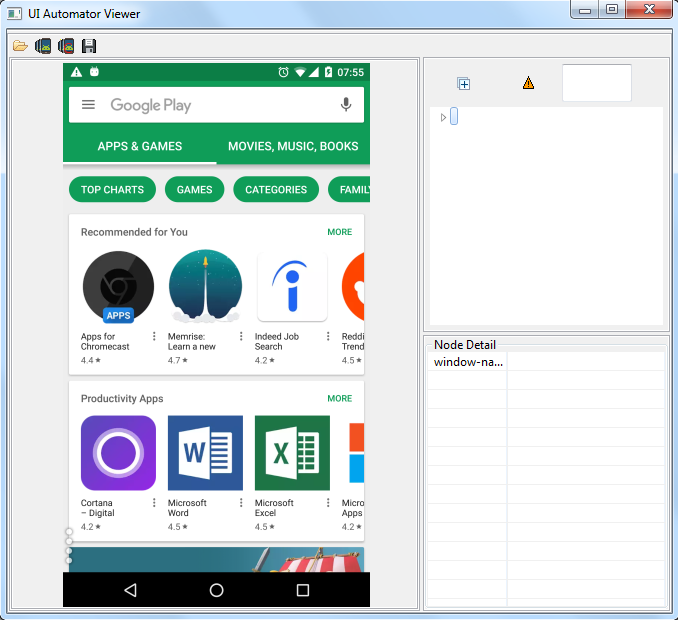
1) Make sure that UIAutomatorViewer is open. If not, then open command prompt, type UIAutomatorViewer and hit Enter. UIAutomatorViewer window would get opened in couple of seconds
2) Connect your mobile phone to your machine using USB
3) Open Play Store app in your mobile device
4) Click on Device Screenshot icon in UIAutomatorViewer and wait till it takes the screenshot and displayed the XML dump as shown below –

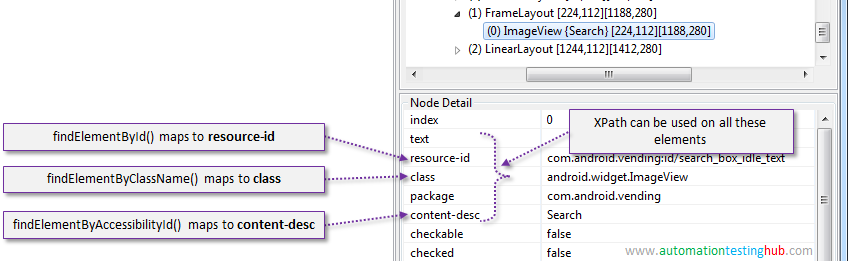
5) Click on Google Play element in UIAutomatorViewer, so that its details are displayed
Important Note: Check the Node Detail section in the below image. The identifiers marked inside the box are the most important ones. These are the identifiers that you would most commonly use to identify the mobile element. If you can’t identify the elements using any of there locators or identifiers, then you would most probably have to go with XPath
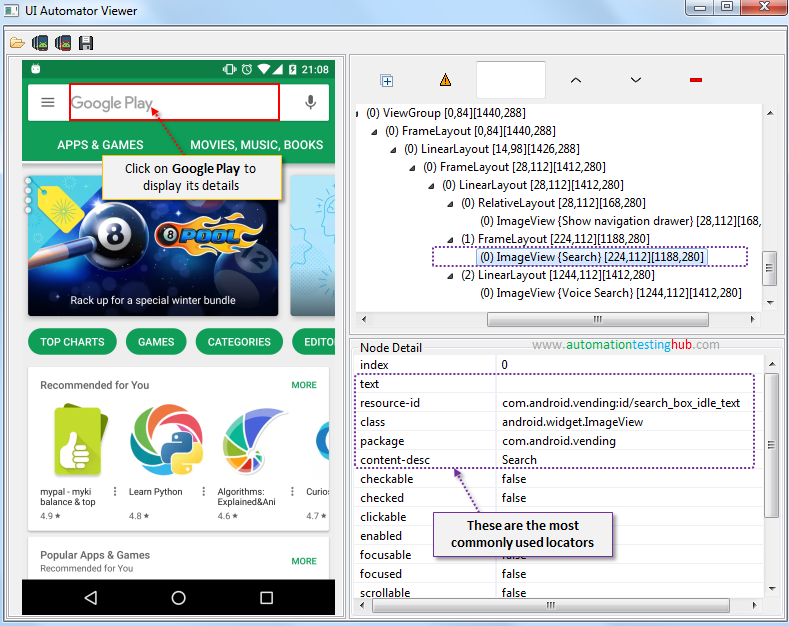

Also, please have a look at the mapping of different locators and find element methods. This is just a easy way to figure out as to which find element method is used with which locator.

Code to identify element – ‘Google Play’
Based on the available properties, ‘Google Play’ element can be identified by the following different ways –

Finding element using ID or Accessibility ID property
//Find element using ID property
driver.findElement(By.id("com.android.vending:id/search_box_idle_text")).click();
//OR
driver.findElementById("com.android.vending:id/search_box_idle_text").click();

//Find element using Accessibility ID
driver.findElementByAccessibilityId("Search").click();
Finding element using XPath
//Find element using XPath - By searching for content-desc
driver.findElement(By.xpath("//android.widget.ImageView[@content-desc = 'Search']")).click();
//OR
driver.findElement(By.xpath("//*[@content-desc = 'Search']")).click();
Finding element using ClassName and findElements() method
//Find element using ClassName property
List elements = driver.findElements(By.className("android.widget.ImageView"));
for(MobileElement element : elements) {
	if(element.getAttribute("contentDescription").equals("Search")) {
		element.click();
		break;
	}
}
Important Note 1: Value of @content-desc property can be obtained at runtime by using getAttribute() method and passing the attribute name as “contentDescription” as shown in line 4 above. Instead of “contentDescription”, you can also use “name” as well. But “name” doesn’t work with UIAutomator2. Hence it’s a good approach to use “contentDescription”.
Important Note 2: content-desc would be the ideal property that you can use in your test automation scripts. This is due to the fact that app developers can set value for this property. They might not be able to set the property for resource-id always, because a lot of times, the resource-id value is set by the underlying Android or iOS framework.
But with content-desc, developers have the option to set any value to it as they want. So you can always ask your developers to set Automation IDs or Accessibility IDs to the elements. This way you will always have a sure-shot way to uniquely identify all the elements.
You can use any of these methods to identify this control and use it in your script. We have given the complete code at the end of the article, but before going there lets have a look at how you can identify the second control as well.
Identify element – ‘Search Google Play’
Tap on ‘Google Play’ element on your mobile device, so that ‘Search Google Play’ element is displayed. Now, inspect the screen again using UIAutomatorViewer so that you get the new screenshot and UI dump. Once you do this, UIAutomatorViewer window would look like this –
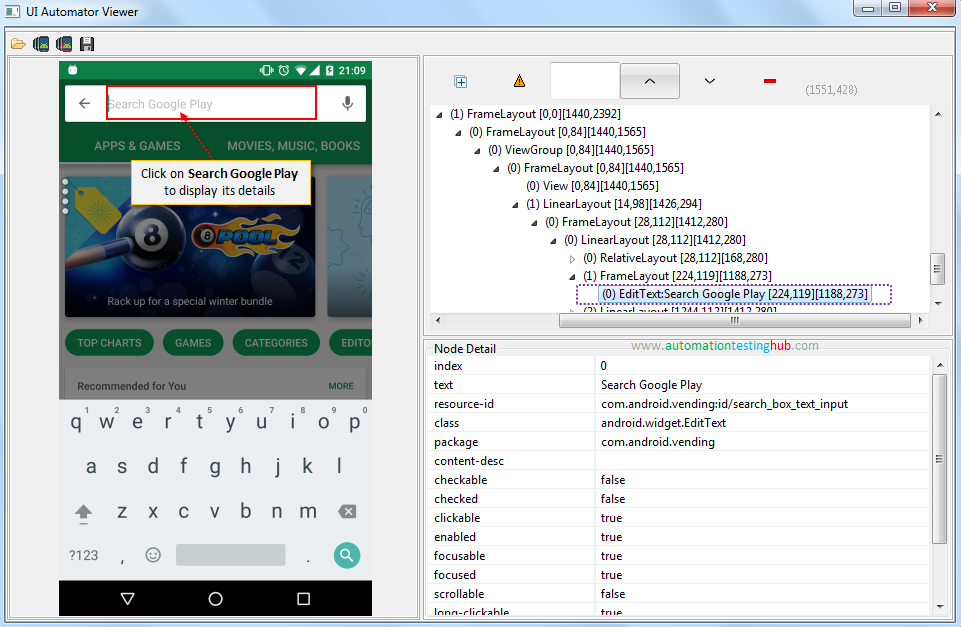

You can see that this element has a value for “text” property but it doesn’t have any value for “content-desc” property. Due to this, you would not be able to use AccessibilityID to identify this element. Let’s now have a look at the different ways using which you can identify this element –
Finding element using ID
//Find element using ID property
driver.findElement(By.id("com.android.vending:id/search_box_text_input")).sendKeys("Google");
OR
driver.findElementById("com.android.vending:id/search_box_text_input").sendKeys("Google");
Finding element using XPath
//Find element using XPath - by searching for text
driver.findElement(By.xpath("//android.widget.EditText[@text = 'Search Google Play']")).sendKeys("Google");
OR
driver.findElement(By.xpath("//*[@text = 'Search Google Play']")).sendKeys("Google");
Find element using findElements() and getAttribute(“text”) method
//Find element using findElements() method - 'text' attribute fetched using getAttribute("text") method
List elements = driver.findElements(By.xpath("//android.widget.EditText"));
for(MobileElement element : elements) {
	if(element.getAttribute("text").equals("Search Google Play")) {
		element.sendKeys("Google");
		break;
	}
}
Find element using findElements() and getText() method
Find element using findElements() method - 'text' attribute fetched using getText() method
List elements = driver.findElements(By.xpath("//android.widget.EditText"));
for(MobileElement element : elements) {
	if(element.getAttribute("text").equals("Search Google Play")) {
		element.sendKeys("Google");
		break;
	}
}
This concludes the element identification process where you have learned about most of the element identification methods used in Appium. We have just given a high level overview of the process of element identification. But there are lot more things that you can do here. You have all the power of XPath available with you and you can use it the same way as in Selenium Webdriver.
There’s just one element identification method that we haven’t covered here, which is find element using Tag Name. This approach is one that is very rarely used, and most of the times you would find that there are other methods to do the same thing – such as using XPath.
I haven’t come across any scenario, where Tag Name was used to identify an element. If you have used or seen some scenario where Tag Name is useful, then please share it with us using the comments section.
Let us now look at the complete code that can be used to automate this scenario. Try out the below code and see if it works fine for you. Before running, please make sure that you start the Appium server & provide correct details about your mobile device and OS version. If you have any doubts, then please check our Appium Tutorial link and refer the appropriate section to find out the exact details.
import java.net.MalformedURLException;
import java.net.URL;

import org.openqa.selenium.By;
import org.openqa.selenium.Keys;
import org.openqa.selenium.remote.DesiredCapabilities;

import io.appium.java_client.AppiumDriver;
import io.appium.java_client.MobileElement;
import io.appium.java_client.android.AndroidDriver;

public class AppiumTest {

public static void main(String[] args) {

		AppiumDriver driver = null;

		//Set the Desired Capabilities
		DesiredCapabilities caps = new DesiredCapabilities();
		caps.setCapability("deviceName", "My Phone");
		caps.setCapability("udid", "ENUL6303030010"); //Give Device ID of your mobile phone
		caps.setCapability("platformName", "Android");
		caps.setCapability("platformVersion", "6.0");
		caps.setCapability("appPackage", "com.android.vending");
		caps.setCapability("appActivity", "com.google.android.finsky.activities.MainActivity");
		caps.setCapability("noReset", "true");

		//Instantiate Appium Driver
		try {
			driver = new AndroidDriver(new URL("http://0.0.0.0:4723/wd/hub"), caps);

		} catch (MalformedURLException e) {
			System.out.println(e.getMessage());
		}

		//Added 5 seconds wait so that the app loads completely before starting with element identification
		try {
			Thread.sleep(5000);
		} catch (InterruptedException e) {
			e.printStackTrace();
		}

		//Find Google Play element using ID property and click on it
		driver.findElement(By.id("com.android.vending:id/search_box_idle_text")).click();

		//Find 'Google Play Store' element and set the value Google
		driver.findElement(By.id("com.android.vending:id/search_box_text_input")).sendKeys("Google");

		//Press Enter key from Keyboard using any of the below methods
		((AndroidDriver) driver).pressKeyCode(66);
		//OR
		//The below code might now work for you, as some keyboards use Search button instead of ENTER. Hence,
		// there are chances that the below line would fail on specific devices
		//driver.findElement(By.id("com.android.vending:id/search_box_text_input")).sendKeys(Keys.ENTER);
	}
}
This completes our article on identifying mobile elements using UIAutomatorViewer. This would at-least help you get started with your test automation journey with Appium. We have few more articles on element identification which we will cover in the next few articles. If you have any queries, or if you are looking to find out some more details about any of these aspects, then please leave us a comment.