
Welcome to our next article on Selenium IDE Tutorial. This article deals with a very important concept, which is – Selenium IDE locators. This topic is important because it is one of the core features of Selenium. Not only Selenium, take any automation tool you like and you will see that locators play a very important part there.
What are Selenium IDE locators
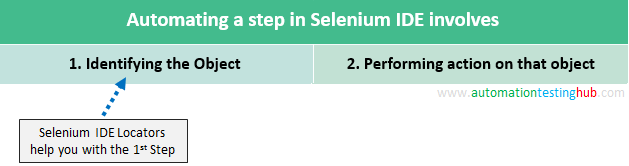
Let us first start with the very basics. What are Selenium IDE locators? Or simply, What are locators? Well, locator is a mechanism using which Selenium IDE can uniquely identify an element on a web page. Whenever you automate any flow with Selenium IDE or with any other automation tool, you will need to do the following 2 things –
- Part 1: Identify the element
- Part 2: Perform action on that element
Selenium IDE locators help you with the first step, i.e., they help you to identify the control.

Have we used Selenium IDE Locators before?
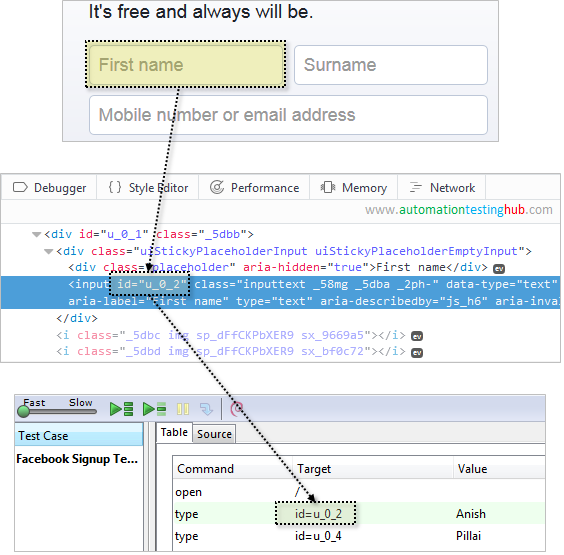
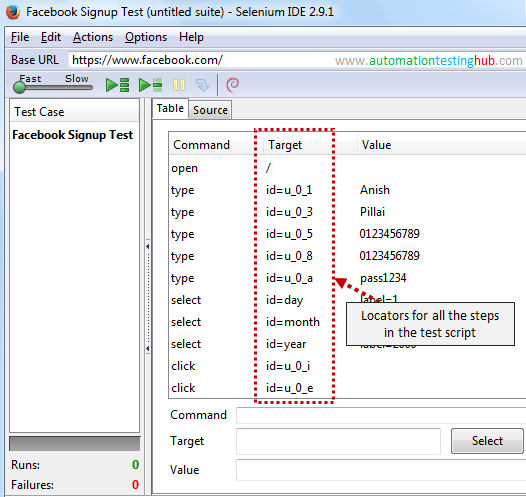
If you have followed our Selenium IDE tutorial series from the beginning, or if you have recorded any script on your own with Selenium IDE, then you have used Selenium IDE locators. If you refer our article on Selenium IDE First Test Script, you will see that Selenium IDE has automatically added the locators for all your steps in the test script. You can see this from the target column, as shown in the below image.

When you recorded the test script, Selenium IDE automatically added the locators on its own. This works well in most of the scenarios, but there might be some situations where you may want to change it. In order to change these, you would need to know about the different types of Selenium IDE locators. So in the coming sections, we will discuss about the different types of locators provided by Selenium IDE and would also show you some examples so that you can understand this concept easily.
Different types of Selenium IDE Locators
Selenium IDE provides multiple different ways using which you can identify elements in a web page. These different types of locators supported by Selenium IDE are given below –
- id
- link
- name
- css
- ui
- xpath
- xpath using link
- xpath using img
- xpath using attributes
- xpath using idRelative
- xpath using position
- dom
- dom using index
- dom using name
Although this list is long, but you don’t need to use all these Selenium IDE locators. There are few locators which are more commonly used and these locators would cover more than 90% of your scenarios. These commonly used locators are: id, name, link and xpath. In this article, we will cover some of these common Selenium IDE locators.
How to inspect elements in Firefox
When you record scripts with Selenium IDE, it will automatically add locators for each of the steps. But to get a good understanding about these locators, it would be a good idea that you are able to identify these locators manually i.e. without using Selenium IDE. This is what you will learn in this section.
Mozilla Firefox (and in fact all other browsers) provides a mechanism by which you can manually find out the properties of the elements on your web page. This mechanism in Firefox is called Inspector. Let us see the steps you need to follow to open inspector.
1. First of all, open the web page that you want to inspect. Since we are using Facebook login as the example here, so we will open Facebook login page in Firefox.
2. Now click on F12 button on your keyboard.
3. You will notice that a window is opened at the bottom of the screen. This window contains a lot of sections, one of which is the Inspector as shown in the below image.
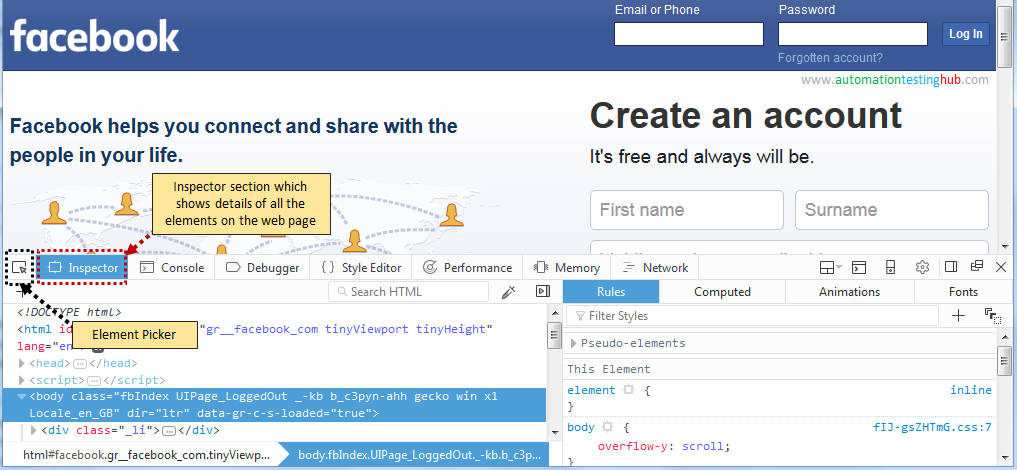

Inspector section shows the details of all the elements on the web page. You can scroll inside this section and you will see that it shows the HTML details of all the elements on the screen. Wherever you move your mouse pointer in the inspector section, that corresponding element would get highlighted on the web page.
4. There is one more important control that you will use here. This controls is displayed just before the inspector section, as highlighted in the image you saw above. Let’s call it Element Picker.
Element picker is basically used to point to any element on the screen so that you can see its details in Inspector section.
5. To do this, click on Element Picker and then select “Email or Phone” text box from Facebook login page. You will see that the details of this element are displayed in the Inspector section as shown below


If you check the details of the field, you will notice that it has some properties such as id, name etc which look similar to the Selenium IDE locators we listed out in the previous section. This way you can use Element Picker to select any element on the screen and then you can inspect its details.
There is one more way to open Inspector in Firefox
Pressing F12 button on your keyboard is the easiest way to open Inspector. However, there is one more way using which you can open Inspector. Let us quickly have a look at this method as well –
1. Click on Menu icon from the top right corner in Firefox
2. Now click on Develop option from the menu
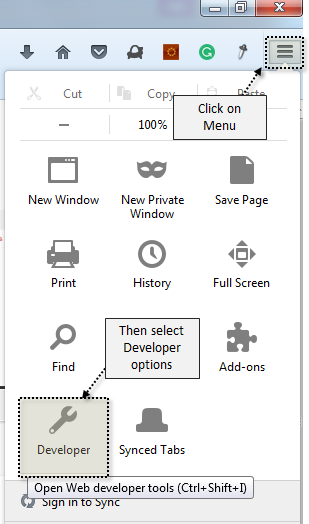

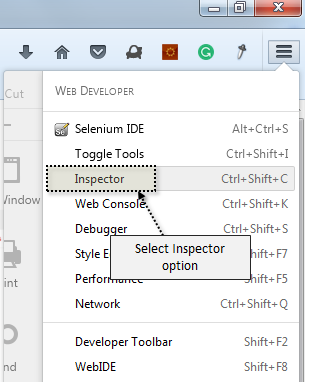
3. From the multiple options that you get now, click on Inspector option. This will open the Inspector window at the bottom of the screen.

Without waiting any further, let us now check out some of the common Selenium IDE locators.
Locate element using – id
If there is one locator that is used most commonly, then it has to be Id. This is due to the reason that it’s considered a good web development practice to provide unique Ids to all the controls in your web pages. Due to this, there is a good probability that you will find this locator very often.
Use Firefox inspector, and inspect on First Name text field. Check its details, you will see that it has an id property as shown in the below image. Please cross check that this is the same value that is displayed in your Selenium IDE test script as well.

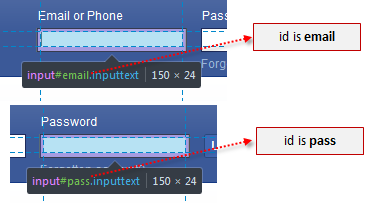
Tip 1: When looking for id property, you don’t always have to check the inspector section to find the id value. When you select Element picker, and then hover the mouse pointer over any element, then id property would be displayed as a tool tip.
Check out the image given below. In the tool tip, the text given in green (excluding #) is the id. Generally speaking, id is represented by the text after # but before the first dot. So, in the below image, “Email or Phone” text field has id as email and “Password” text field has id as pass.

Tip 2: Id locator is generally available for certain kinds of controls. You will find id locator mostly being used for controls where you can set some values, such as text boxes, radio buttons, drop downs etc. Other than this id locator may also be found on buttons. Other elements such as links, plain texts & labels would mostly not have the id locator. Please note that this is only a general observation and it might not be true everywhere.
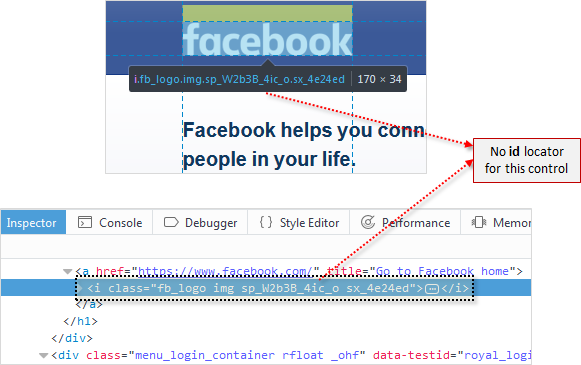
Below image shows an example from Facebook login page where the element doesn’t have id property. As an extension of Tip 1, please note that if a control doesn’t have id locator, then it will not show # and id value in the tool tip.

Locate element using – name
Name locator is mostly used for text fields. You would probably not see it being used for any other type of controls. So, on Facebook login page, you can see that name locator would be available for all the text fields like Email or Phone, Password, First name, Surname etc.
Click on element picker and then select “Mobile number or email address” field. You will see that it has a name locator with value reg_email__
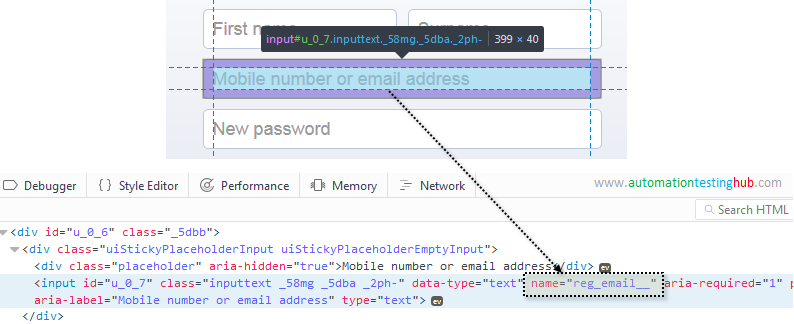

If you want, then you can add this value in your Selenium IDE script. Just replace the existing target with this locator. The format will be same as that for id, i.e., name=reg_email__
Tip 3: We had mentioned before that name locator is usually associated with text fields only. And mostly, text fields have id property as well. So as a general practice, try using id locator if its available. If its not available, then you can go with the name locator.
Locate element using – link
As the name suggests, this locator is used to identify links. And it does that using the link’s text. If you scroll down to the bottom of the Facebook login page, you will see different links such as Sign Up, Log In, Messenger etc. Inspect the Messenger element to check its details. You will see that it displays the link text in the inspector section as shown below
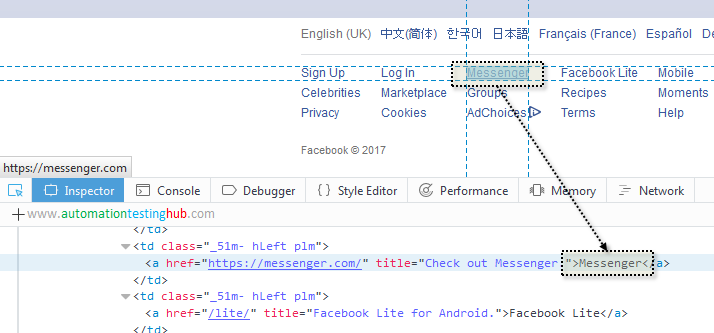

The format for using link is similar to all other locators you saw before, i.e., link=Messenger
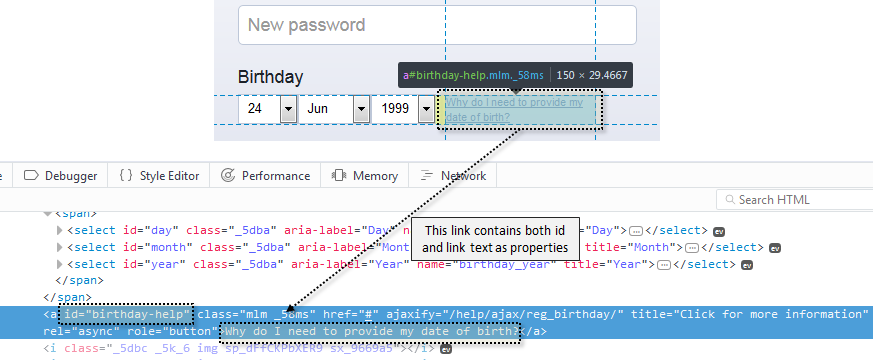
Tip 4: There would be many cases where the links would have other properties as well, such as “Why do I need to provide my date of birth?” link, which has an id property as well. In such situations, its still advisable to use the link locator only, and not the id locator. This is due to the reason that a link’s text is a visual representation on the screen and it is a good idea to base your tests on what can be visually checked on the screen.

Locate element using – xpath
In very simple terms, xpath simply means the position or path of an element on the web page. Xpath can be used to identify any control on the web page because the position/location of every element is always unique. To understand it, consider a web page which has 10 elements. Now each of these elements will have a unique position. There will be an element on the first position and some element will be there on 2nd, 3rd, 4th position and so on.
So at least from an element’s position point of view, it can be identified uniquely. There will be only 1 element at each position. There can’t be 2 elements in the same position. Hence, with xpath you are guaranteed to identify any element on a webpage.
But identification using xpath is not that easy. There are many different variations in which you can use xpath. The position of an element can be either absolute or relative. Due to this, xpath in itself deserves its own set of articles. So in this article, we will talk about the most basic form of xpath which has this format – //tag[@locator=’value’]. Let’s understand this with the help of the below image
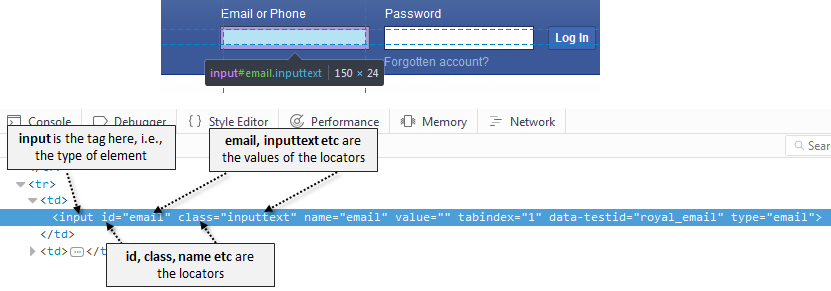

So using the above format, you can define the xpath for the “Email or Phone” text field as //input[@id=’email’] or //input[@name=’email’] or //input[@data-testid=’royal_email’] or //input[@type=’email’]. You can use any locator and value combination provided its a unique combination.
Tip 5: You should go for Xpath only when you don’t have any other way to identify a control. This is because it’s disadvantageous to identify an element based on its position. Consider a scenario where you identify an element based on its position.
Let’s assume that this element is on position 8. Now consider a case, that a new element gets added in 5th position. Due to this, the position of all the subsequent elements get changed. Our original element which was on position 8 now moves to position 9. If you are using xpath absolute position to identify this element, then your script would fail because the elements position changed.
Due to this, there is a higher probability of you needing to do rework in your scripts at regular basis. Although there are some best practices to using xpath, we will have a look at those in a different article.
All these locators would be good enough to get you started with Selenium IDE. And it would probably work for you in all the common scenarios. There is still much more to learn with Selenium IDE locators. This and lot more would be covered in our future articles on Selenium IDE tutorials.