This article is a continuation of our previous one, where you learnt how to create a cucumber test runner class. In this article, you will see how to create cucumber step definition class. After you create this class, you will also add the step definition methods to it. Before we start creating step definition class, let’s first get some basic understanding about it.
Note: This article is a part of our Cucumber Tutorial series. Head over to our Selenium Cucumber Tutorial main page for the step by step cucumber setup guide
What is Cucumber step definition class?
Cucumber step definition class is a normal java class where you can store step definition methods. And a step definition method is a java method that is linked to a step in the scenario in feature file. For each scenario step in your feature file, you should add a step definition method. This way, all your steps in feature files will have a method associated to it. So that, when you run the feature file, Cucumber would execute the step definition methods linked with the steps.
Let us now identify the step definitions (also called as step defs) that you need to add in your project.
Identify the step definition methods to be added
One of the good things about Cucumber is that, it itself provides you the list of step definition methods which you have not implemented yet. It also provides you with the syntax of these methods. Let’s see the steps using which you can generate these step definition methods –
1. In Eclipse, open the test runner class, TestRunner_GoogleHomepage, which you created in the previous article (create cucumber test runner class)
2. Right click anywhere inside the class and select Run As > JUnit Test
3. Once the test execution completes, you will see that Eclipse pops up console output window on the screen. In this console output window, cucumber first displays this message – You can implement missing steps with the snippets below.
Below this message, cucumber lists down all the step definition methods that you have to implement.
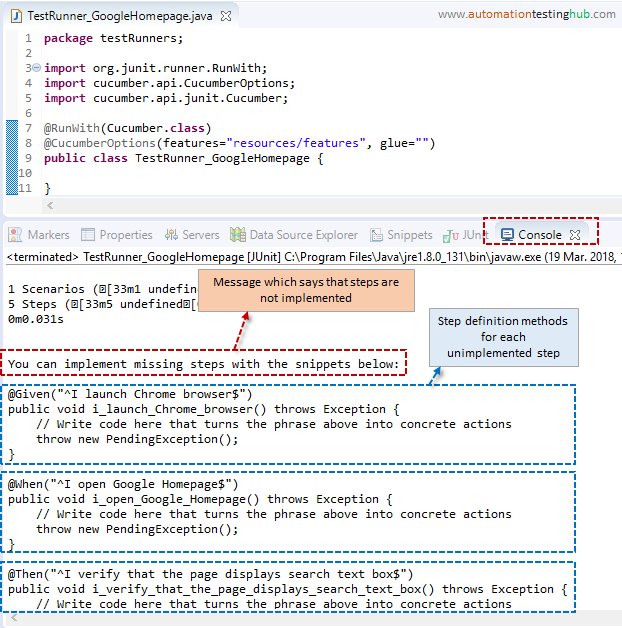
This way, cucumber has itself generated the list of step defs that you have to implement. Also, it provides you with the correct syntax of these methods. All that you have to do now is to copy paste these methods to the step definition class. Let’s see how we can do this.
Create new step definition class
In this section, we will create a new package and then add a new step definition class to it. The steps for this are given below –
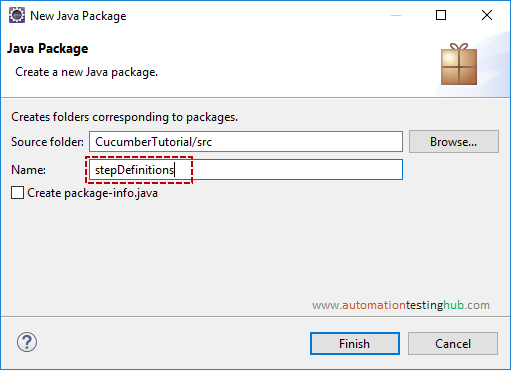
1. Right click on src folder and select New > Package

2. Give package name as stepDefinitions and click on Finish button
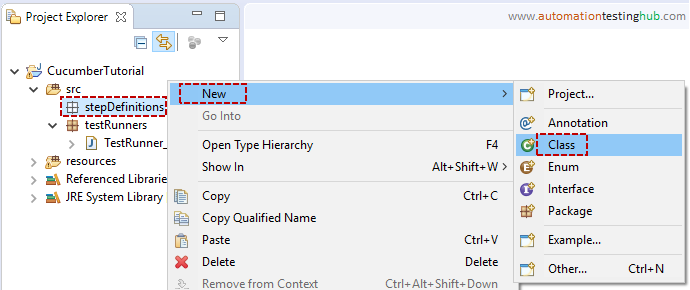
3. New package is now successfully added in src folder. Now, right click on this package and select New > Class
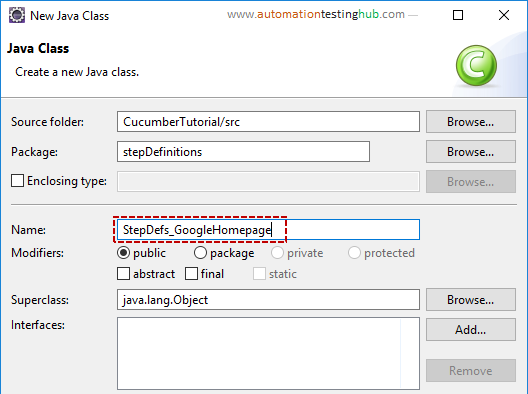
4. Enter class name as StepDefs_GoogleHomepage and click on Finish button
With this, you have successfully created cucumber step definition class. Let us now add the step definition methods to this class.
Add step definition methods to the class
Follow the steps given below to add step definition methods to the class –
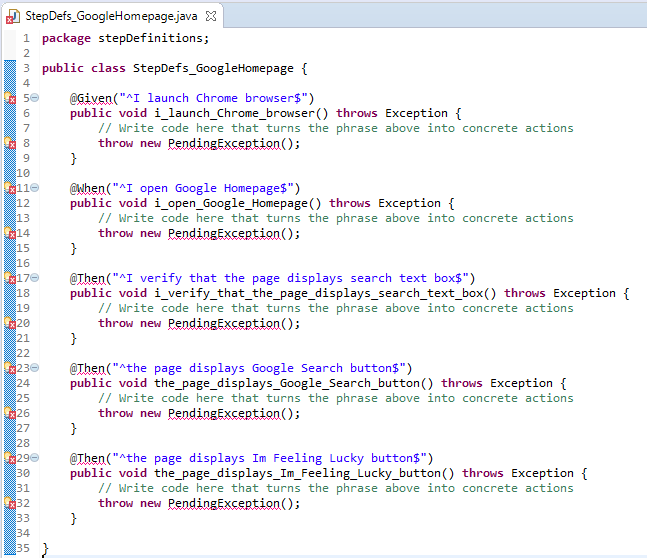
1. Open the console window in Eclipse and copy all the methods that are given after “You can implement missing steps with the snippets below:” line
2. Paste all these methods in StepDefs_GoogleHomepage class as shown below
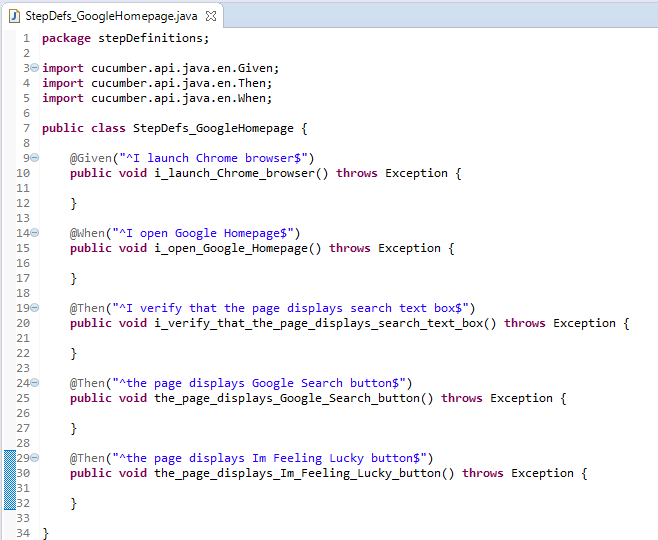
3. Add import statements for Given, When and Then. After this, delete the default comment and throw new PendingException() statement from each step definition method. The code will now look as in the below image. Please note that it doesn’t have any errors now
With this, you have now implemented all the step definition methods at a basic level. As of now, these methods are empty. This means that if you re-run the test runner class, you won’t see any message for unimplemented steps as you saw previously.
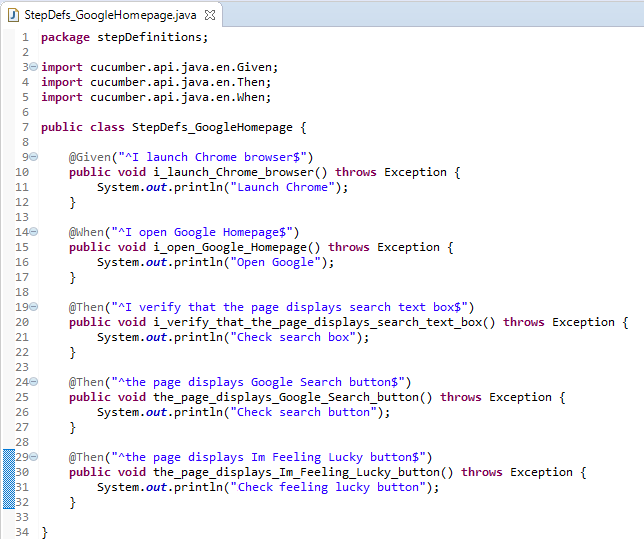
Just so that we see some results when we run this test again, let us add print statements in each of these methods. With this approach, when you run the scripts, there will be some text printed on the console. This will show that the step definitions methods were executed.
4. Add System.out.println() method in each step definition method. The complete code will look like this
Let us now re-run the test runner class and check that the step definition methods that you have added work fine.
Run cucumber test runner class once again
Before we run the cucumber test runner once again, we need to add the path of the step definition class in the test runner. Let’s do this first and then run the test runner class.
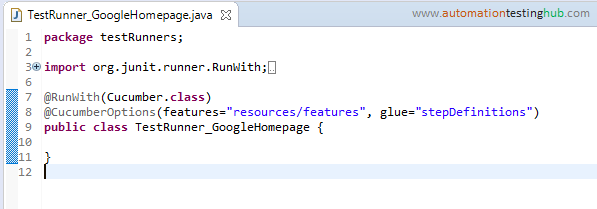
1. Open TestRunner_GoogleHomepage class
2. In glue keyword, add the package name of step definition class. Complete @CucumberOptions annotation is given below
@CucumberOptions(features="resources/features", glue="stepDefinitions")
For better readability, you can split this in multiple lines as well
@CucumberOptions(
		features="resources/features",
		glue="stepDefinitions"
		)
The test runner class should look as shown in the below image
3. Now, right click inside this class and select Run As > JUnit Test
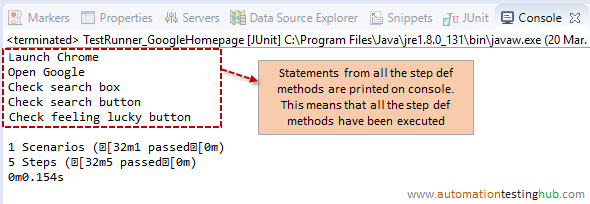
4. Once the test case execution completes, console view would be displayed. In the console view, you can see that there is no message for missing implementation for steps. Instead, the console displays all the statements that you had added in step definition methods. This means that the test runner has executed all the step definition methods successfully.
We will end the article at this point, as you have completed creating a basic cucumber step definition class. Even though this class is kind of empty, as it just prints out some statements on the console. But from cucumber setup point of view, this is a big step.
In our next article, we will create basic selenium methods and add it to these step definition methods. This way, we have a full-fledged script that performs some actions on a web page. If you have any doubts or any other general feedback, then you can get in touch with us using the comments section.
Next Article: Add selenium logic to the step def methods