In our previous article in Cucumber tutorial series, we showed you how to add your first feature file in Eclipse project. In this article, we will go one step forward and show you how to run this feature file.
With a cucumber-based framework, you cannot run a feature file on its own. You will need to create a java class, which in turn will run this cucumber feature file. We call this class as cucumber test runner class.
Before we go ahead and add new test runner class, lets first have a quick look at cucumber test runner class.
Note: This article is a part of our Cucumber Tutorial series. Head over to our Selenium Cucumber Tutorial main page for the step by step cucumber setup guide
What is Cucumber Test Runner Class?
In very simple terms, Cucumber test runner class is one of the many mechanisms using which you can run Cucumber feature file. The test runner class that will use in this article is a JUnit runner class. Below are some of its salient features:
- In addition to running a cucumber feature file, the test runner class also acts as an interlink between feature files and step definition classes. It is in test runner class, that you provide the path for both feature file and step defs class
- There are multiple types of test runners such as JUnit runner, CLI runner, Android runner etc, that you can use to run Cucumber feature file. In this article, we will be using the JUnit runner
- With a test runner class, you have the option to run either a single feature file, or multiple feature files as well. For now, we will focus on running a single feature file
Add Cucumber Test Runner class to Eclipse project
Follow the steps given below to add Cucumber test runner class to your Eclipse project:
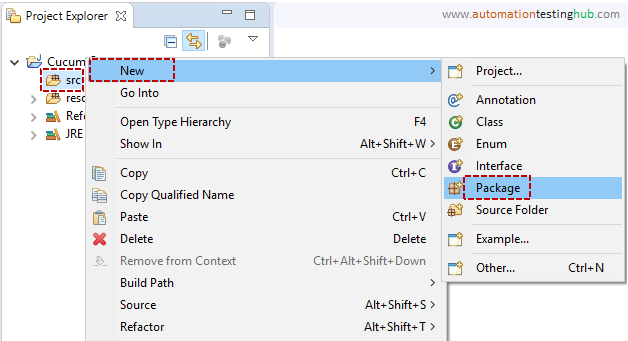
1. First we need to have a new package where we will add the test runner class. To create this package, right click on src folder and select New > Package
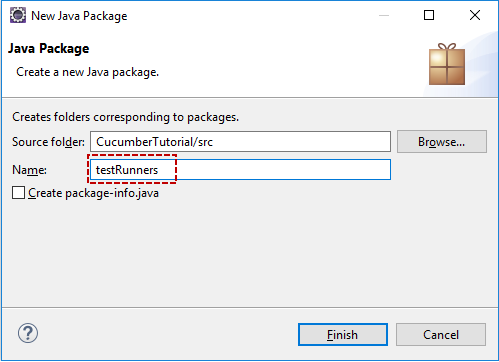
2. Give package name as testRunners and click on Finish button
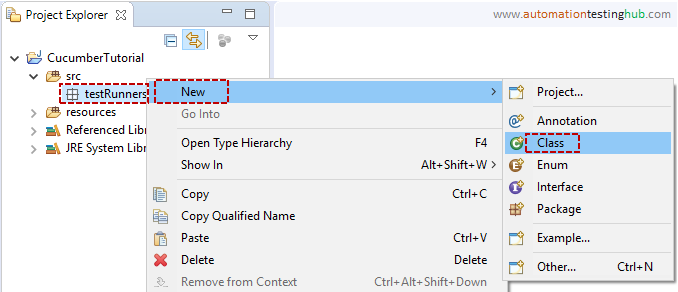
3. The package will now be added to the project. Right click on the package and select New > Class
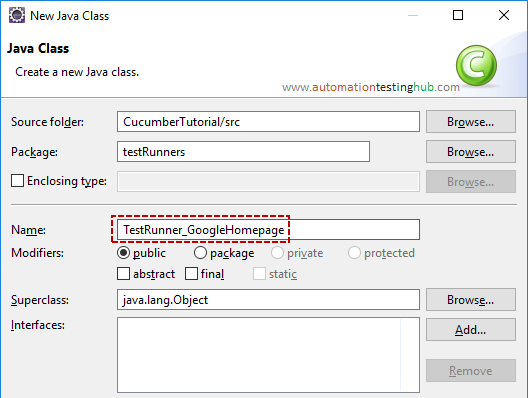
4. Give class name as TestRunner_GoogleHomepage and click on Finish button
Test runner class is now successfully added to your eclipse project. Let us now add code to the test runner class.
Add code to test runner class
In this section, we will just add the basic code that will help you run the cucumber feature file. At the basic level, you need to add two annotations to your test runner class. These annotations are –
@RunWith(Cucumber.class) @CucumberOptions(features="", glue=" ")
The complete code for cucumber test runner class (including the annotations) is given below. You can copy paste the entire code to your runner class.
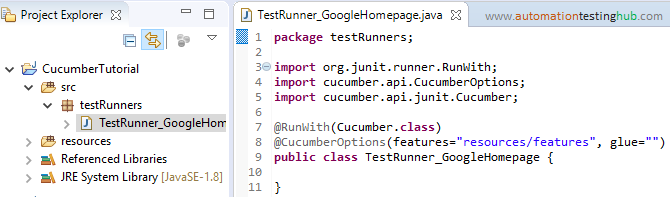
package testRunners;

import org.junit.runner.RunWith;
import cucumber.api.CucumberOptions;
import cucumber.api.junit.Cucumber;

@RunWith(Cucumber.class)
@CucumberOptions(features="resources/features", glue="")
public class TestRunner_GoogleHomepage {

}
After you add the code, the test runner class should look something like this –
Before proceeding further, let us have a quick look at the annotations that you have used in the test runner class.
Understanding the annotations in the test runner class
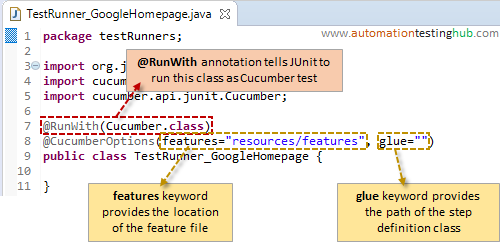
You will see that our sample test runner class has only two annotations. These are @RunWith and @CucumberOptions
1. @RunWith annotation: This is a JUnit annotation that specifies which runner it has to use to execute this class. You can see that we have provided Cucumber.class as a parameter with this annotation. With this, JUnit will know that it has to execute this test case as a Cucumber test.
2. @CucumberOptions annotation: This annotation provides some important information which will be used to run your cucumber feature file. At the very least, Java should know the location of the feature file as well as the step definition class in your project. CucumberOptions annotation will do just that. As of now, we have provided two parameters in this annotation.
The first parameter, called features, provides the location of the feature file. Similarly, the second parameter, called glue, provides the path of the step definition class.
We have currently stored the feature file in resources > features folder in the project. So, we have added resources/features as the path for the feature file. Also, the glue parameter is empty, because we have not created any step definitions class till now.
It’s not that the @CucumberOptions annotation takes only these two parameters. There are few more useful parameters which you can add here. We will cover all those parameters in some of our upcoming articles in Cucumber testing tutorial.
With this, we finish our article on creating the basic cucumber test runner class which will help you run the feature file. In our next article, we will run this test runner class and then add the step definitions class as well.
Next Article: Create Step definitions class and add feature file steps to it