Appium is not just limited to opening your app and performing some actions on it. It provides many more functionalities in the way you interact with your app. One such feature is that you can use Appium to install the app on your mobile phone using its .apk file. To use this feature, it would be necessary to enable USB Debugging on your device.
The primary function of USB debugging is to facilitate a connection between an android device and a computer. Developers can use this mode to transfer the app to mobile devices for testing. Enabling USB debugging will provide you with the capability to directly install these apps without going to the app store.
Enabling USB Debugging on your android device is a two step process:
1: Firstly, get the Developer options on your phone
2: Then, use Developer options to enable USB Debugging
Lets look at each of these steps in more detail.
Get the Developer Options on your phone
Why do you need access to “Developer options” on your device? Well, it is considered to be a security feature and hence it is by default a hidden option on your device settings. As the name rightly suggests it is beneficial and mostly used by the developers. Developers use this Mode to transfer apps to a device for testing.
The process to activate Developer Options on an android device is given below:
Step 1: Take your Android device -> go to Menu/Home -> search for the Icon named “Settings”
![]()
Step 2: Click on the “Settings” Icon and scroll down through the list.
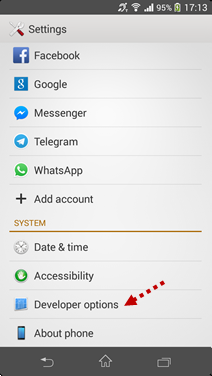
Under the sub-title “SYSTEM” check for an option named “Developer options”. If you can see “Developer options” listed there, it means Developer options is already enabled on your Android device.
If Developer options is already enabled, then you can directly skip over to the next section in this article – “Enable USB Debugging option on your phone”
On the other hand, if you do not find the “Developer options” listed there, then please follow the below procedure to enable it –
Step 3: Click on the “About phone” option listed under the “SYSTEM” section at the end of the list . When you click on the “About phone” option, you can see the list of options as shown in the below image

Step 4: Click the “Build Number” option multiple times, till one of these messages appear –
“You are now 2 steps away from being a developer”
“You are now 1 steps away from being a developer”
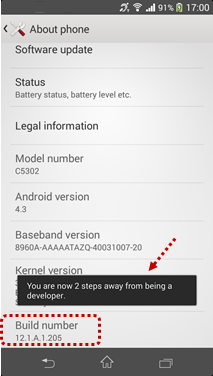
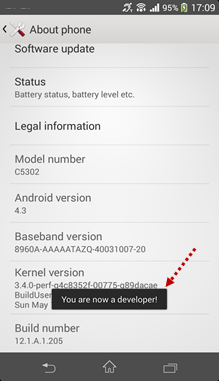
After this, click on “Build Number” couple of more times until you finally see the below message –
“You are a Developer now” or “Developer mode has been enabled”.
(To be precise – It is 5 clicks on some devices and 7 clicks on others)
Step 5: Tap the back button on your device to verify the “Developer options” is listed under the “SYSTEM” settings
So now you can see the “Developer options” enabled on your device. Let us now see how to enable the USB debugging option on your android device.
Enable USB Debugging option on your phone
By default the USB debugging mode is disabled for any brand new device to avoid unintentional modifications on it. But you would need to enable debugging option manually for your Android development/testing process.
So now, lets see how to enable the USB debugging mode by following the steps given below:
Step 1: Go to the “Settings” option of your phone and verify again, if you can see the “Developer options” listed under the “SYSTEM” section as shown below
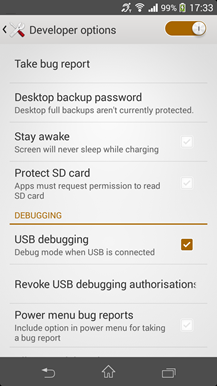
Step 2: Click the “Developer options” and check if “USB Debugging” checkbox is listed under the sub-title “Debugging” as shown below:
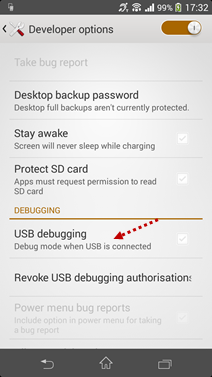
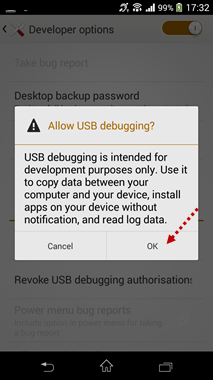
Step 3: Tick the “USB Debugging” checkbox and click “OK” in the popup message. You can see that “USB Debugging” has been enabled now as shown in the below image:
NOTE:- As a best practice, you can disable USB Debugging when you don’t need them, by unchecking the “USB Debugging” mode under the “Developer options”.
You now have USB Debugging enabled on your android phone and you would be able to use Appium to interact with your phone and install & delete apps through code.
Feel free to contact us using the comments section if you face any issues while implementing the steps given in this article. You are now one more step closer to setting up Appium on your machine. Check out our next article from the Appium Tutorial series which would help you download and setup Eclipse IDE.